Loading repository data…
 Courtesy of : Zeplin Blog
Loading repository data…
xeieshan / repository
A starter project for Sample Project in swift 5, Xcode 12.5 (also bridging header included so you could use objective c code in it as well ). For objectiveC version : https://github.com/xeieshan/SampleProject > Supports iOS 15+, Swift 5.x
A transparent discovery signal based on current public GitHub metadata.
This score does not audit code, security, maintainers, documentation quality, or suitability. Verify the repository and its current documentation before adoption.
Just like software, this document will rot unless we take care of it. We encourage everyone to help us on that – just open an issue or send a pull request!
Swift has had a meteoric rise in popularity since its inception in 2014. In 2015, Swift was rated the most loved programming language on Stack Overflow, and it’s currently ranked 17 in the programming language rankings guide of June 2016, according to Redmonk who wrote “there is no debate that Swift is growing faster than anything else we track.”.
A common question for a new iOS developer is — should I be learning Swift or Objective-C? There have been mixed messages from the iOS developer community.
Learning iOS development with Swift doesn’t prevent you from also learning Objective-C at some point in the future. Regardless of the language you’re programming in, the underlying frameworks are mostly identical, with tweaks to syntax. Learning iOS development with Swift isn’t necessarily setting your flag firmly in the Swift camp. You can use Objective C code in your Swift project, or vice versa. Learning Swift is a good place to start, and you’ll find exploring Objective-C easier with iOS experience behind you. For comparison, the following demonstrates the same code in Swift and Objective-C.
Follow this link for 8 Reasons Why You Should Learn Swift.
A common question when beginning an iOS project is whether to write all views in code or use Interface Builder with Storyboards or XIB files. Both are known to occasionally result in working software. However, there are a few considerations:
Please follow the url [macbook-for-developers] [macbook-for-developers]:http://martiancraft.com/blog/2015/08/macbook-for-developers/
With no GUI tools, handling all custom positioning, animation, etc. programmatically.
A visual tool for laying out multiple application views and the transitions between them.
A classic beginner’s mistake is to create one massive project-wide Storyboard. A Storyboard is a board with a story to tell. It shouldn't be used to mix unrelated stories into one big volume.
To keep all those hundreds of source files ending up in the same directory, it's a good idea to set up some folder structure depending on your architecture. For instance, you can use the following:
Classes
Application Delegate Category Constant Models Network Manager Shared Manager Utility Function View Controller
Views
StoryBoard.storyboard LaunchScreen.xib
Resources
Slices Fonts Sounds
First, create them as groups (little yellow "folders") within the group with your project's name in Xcode's Project Navigator. Then, for each of the groups, link them to an actual directory in your project path by opening their File Inspector on the right, hitting the little gray folder icon, and creating a new subfolder with the name of the group in your project directory.
If you're planning on including external dependencies (e.g. third-party libraries) in your project, CocoaPods offers easy and fast integration. Install it like so:
sudo gem install cocoapods
To get started, move inside your iOS project folder and run
pod init
This creates a Podfile, which will hold all your dependencies in one place. After adding your dependencies to the Podfile, you run
pod install
to install the libraries and include them as part of a workspace which also holds your own project. It is generally recommended to commit the installed dependencies to your own repo, instead of relying on having each developer running pod install after a fresh checkout.
Note that from now on, you'll need to open the .xcworkspace file instead of .xcproject, or your code will not compile. The command
pod update
will update all pods to the newest versions permitted by the Podfile. You can use a wealth of operators to specify your exact version requirements.
The two most common ways of storing constants in Swift are:
let someStringConstant = "someStringConstant"
// OR static
static let someStaticStringConstant = "someStaticStringConstant"
This has the advantage of being short. It’s just called in code like:
print(someStringConstant).
*Quick note: Globals are lazy — a.k.a. they will only be initialized when accessed the first time.
In my opinion the best way to deal with global constants is to create a Struct.
struct Constants {
    static let someNotification = "TEST"
}
Then, for example, call it like this in your code:
print(Constants.someNotification)
If you want a better organization I advise you to use segmented sub structs.
struct K {
    struct NotificationKey {
        static let Welcome = "kWelcomeNotif"
    }

    struct Path {
        static let Documents = NSSearchPathForDirectoriesInDomains(.DocumentDirectory, .UserDomainMask, true)[0] as String
        static let Tmp = NSTemporaryDirectory()
    }
}
This method has the advantage of readability. The disadvantage of this method (and my personal hangup) is that these calls can get quite long.
When and where use constants : If a stored value in your code won’t change, always declare it as a constant with the let keyword. Use variables only for storing values that need to be able to change.
These are the idiomatic ways for components to notify others about things:
Asset catalogs are the best way to manage all your project's visual assets. They can hold both universal and device-specific (iPhone 4-inch, iPhone 4.7-inch, iPhone 5.8-inch, iPhone Retina, iPad, etc.) assets and will automatically serve the correct ones for a given name. Teaching your designer(s) how to add and commit things there (Xcode has its own built-in Git client) can save a lot of time that would otherwise be spent copying stuff from emails or other channels to the codebase. It also allows them to instantly try out their changes and iterate if needed.
An asset catalog can contain four types of images:
Asset catalog colors on Xcode 9
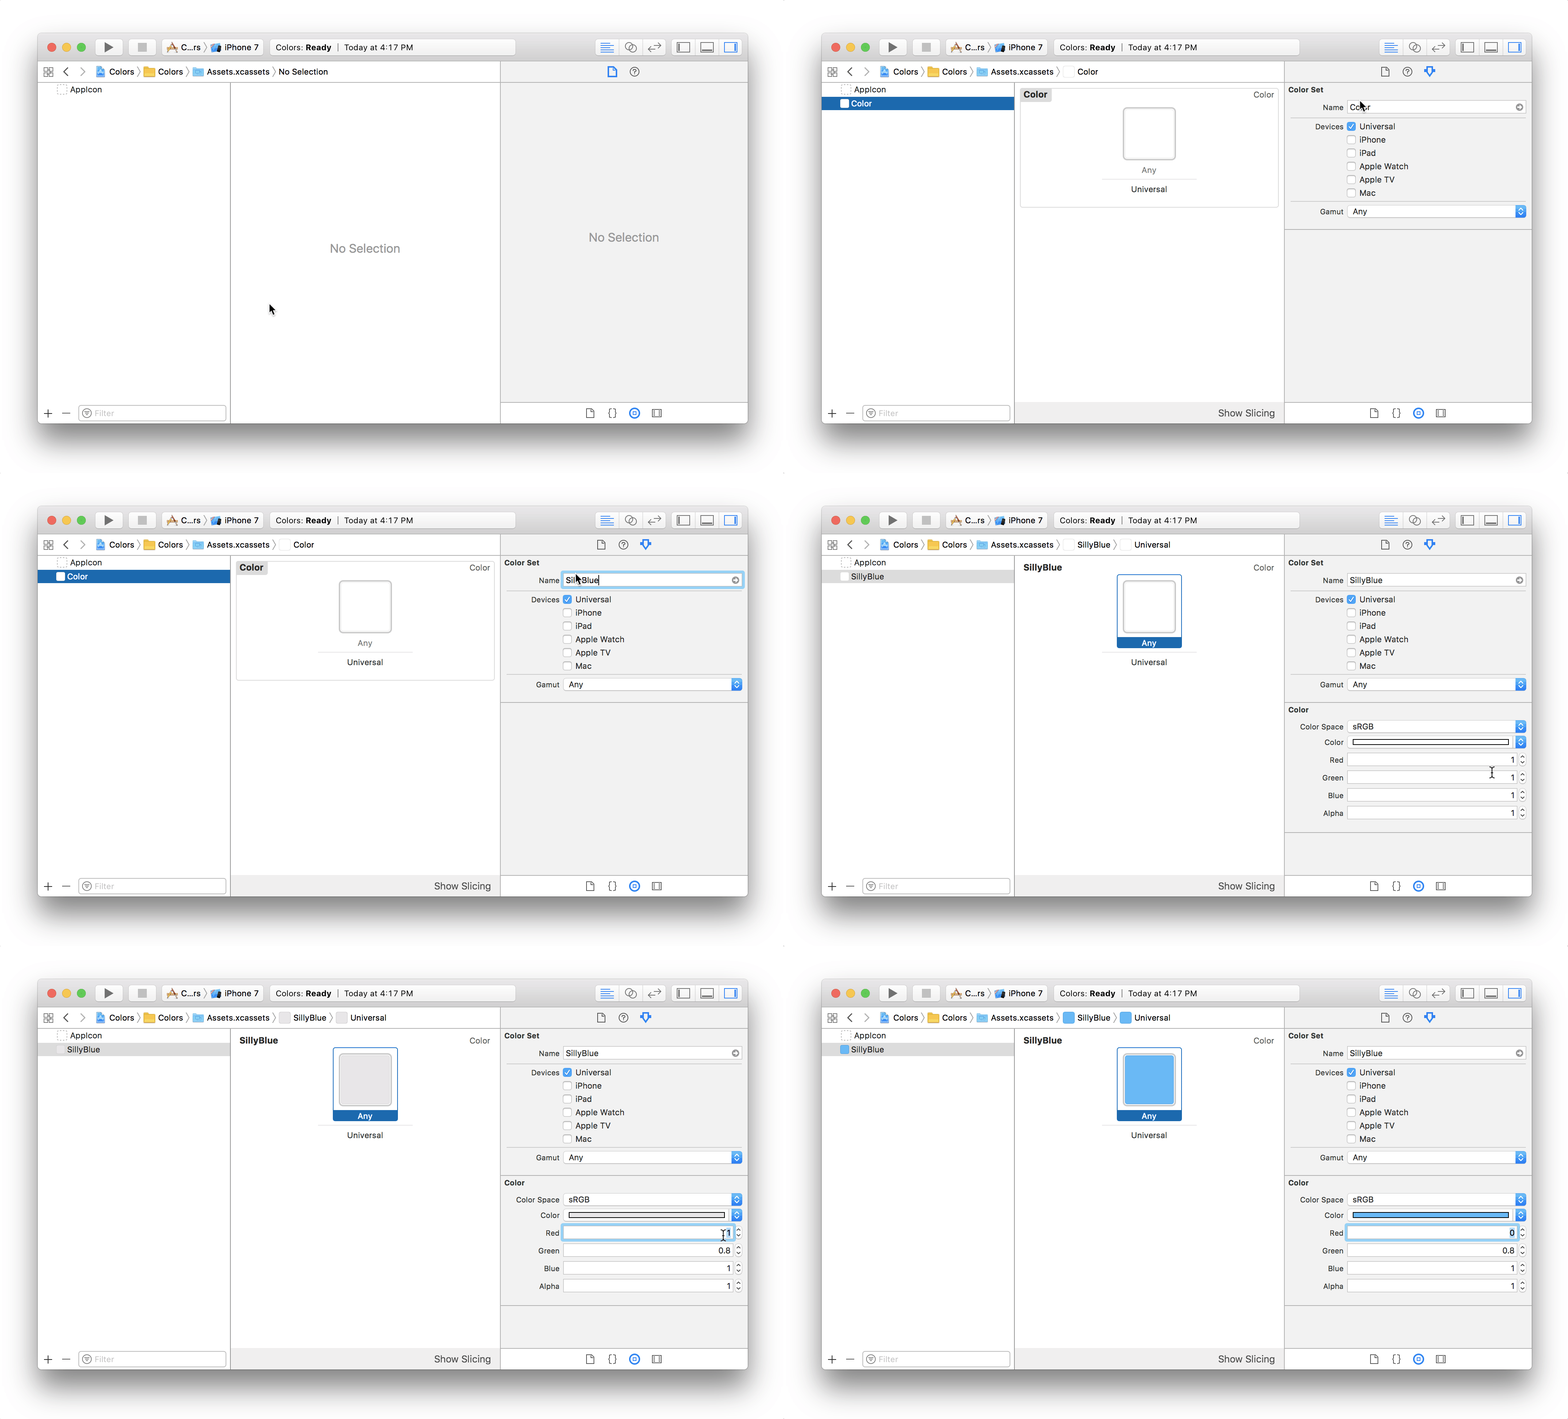
One of most exciting features on Xcode 9 is being able to add colors to an asset catalog, or as known as the .xcassets directory, alongside your images. This feature helps developers save time and avoid mistakes, by organizing project colors in a single location. Much cleaner!
.xcassets directory in Xcode, press the plus button on the bottom left and select “New Color Set”.
Courtesy of : Zeplin Blog
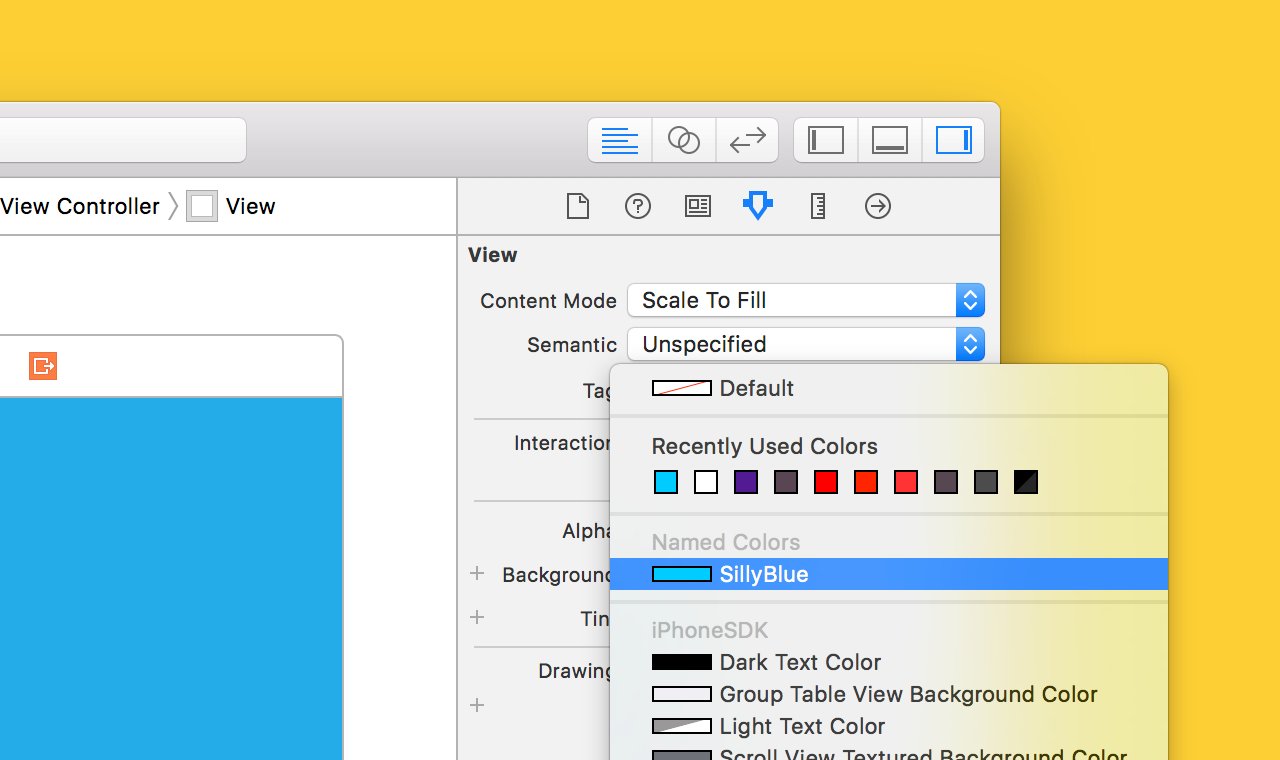
UIColor on iOS and NSColor on macOS now have a convenience initializer in Swift to access these colors by name:// iOS
let color = UIColor(named: "SillyBlue")
// macOS
let color = NSColor(named: "SillyBlue")
These methods are only available if you’re targeting iOS 11+ or macOS 10.13+, so you might need to stick to your existing color constants for a while.
Asset catalogs expose only the names of image sets, abstracting away the actual file names within the set. This nicely prevents asset name conflicts, as files such as button_large@2x.png are now namespaced inside their image sets. However, some discipline when naming assets can make life easier:
IconCheckmarkHighlighted.png // Universal, non-Retina
IconCheckmarkHighlighted@2x.png // Universal @2x, Retina
IconCheckmarkHighlighted@3x.png // Universal @3x, Retina (@3x is only on iPhone as of now!)
IconCheckmarkHighlighted~iphone.png // iPhone, non-Retina
IconCheckmarkHighlighted@2x~iphone.png // iPhone, Retina
IconCheckmarkHighlighted-568h@2x~iphone.png // iPhone, Retina, 4-inch
IconCheckmarkHighlighted~ipad.png // iPad, non-Retina
IconCheckmarkHighlighted@2x~ipad.png // iPad, Retina
The modifiers -568h, @2x, ~iphone and ~ipad are not required per se, but having them in the file name when dragging the file to an image set will automatically place them in the right "slot", thereby preventing assignment mistakes that can be hard to hunt down.
`Developers work with point values, so it is important to understand the difference with pixels. When the iPhone was first introduced, the two units were the same: 1pt equals 1px. Then when retina screens came along, 1pt became 2px. So think of points as the values in the or