ECLaboratorio /
BubbleShowCase-Android
BubbleShowCase is a framework that let you to use informative bubbles to help your users pointing out different App features.
79/100 healthLoading repository data…
udacity / repository
App that lets you style your own Android! This uses Fragments to create a flexible and responsive UI.
A transparent discovery signal based on current public GitHub metadata.
This score does not audit code, security, maintainers, documentation quality, or suitability. Verify the repository and its current documentation before adoption.
App that lets you style your own Android! This uses Fragments to create a flexible and responsive UI.
This is a exercise repository for the AndroidMe example app which is part of the Advanced Android App Development course on Udacity.
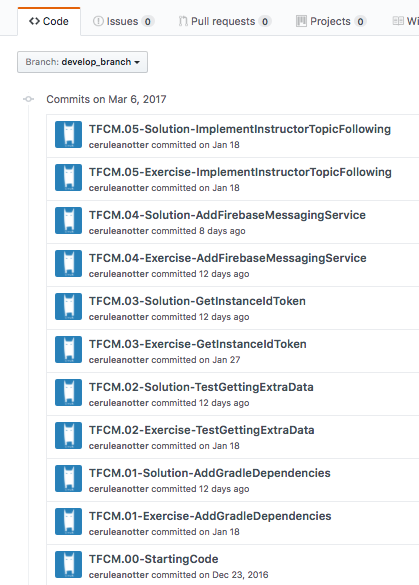
Each code repository in this class has a chain of commits that looks like this:

These commits show every step you'll take to create the app. They include Exercise commits and Solution commits.
Exercise commits contain instructions for completing the exercise, while solution commits show the completed exercise. You can tell what a commit is by looking at its commit message.
For example, TFCM.01-Exercise-AddGradleDependencies is the first code step in the Firebase Cloud Messaging (FCM) lesson. This is the exercise commit, and the exercise is called Add Gradle Dependencies.
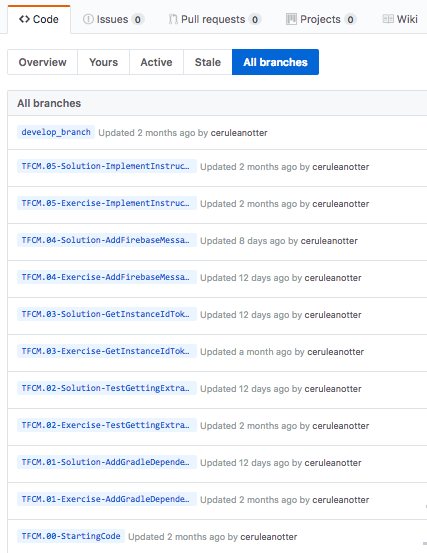
Each commit also has a branch associated with it of the same name as the commit message, seen below:
Access all branches from this tab


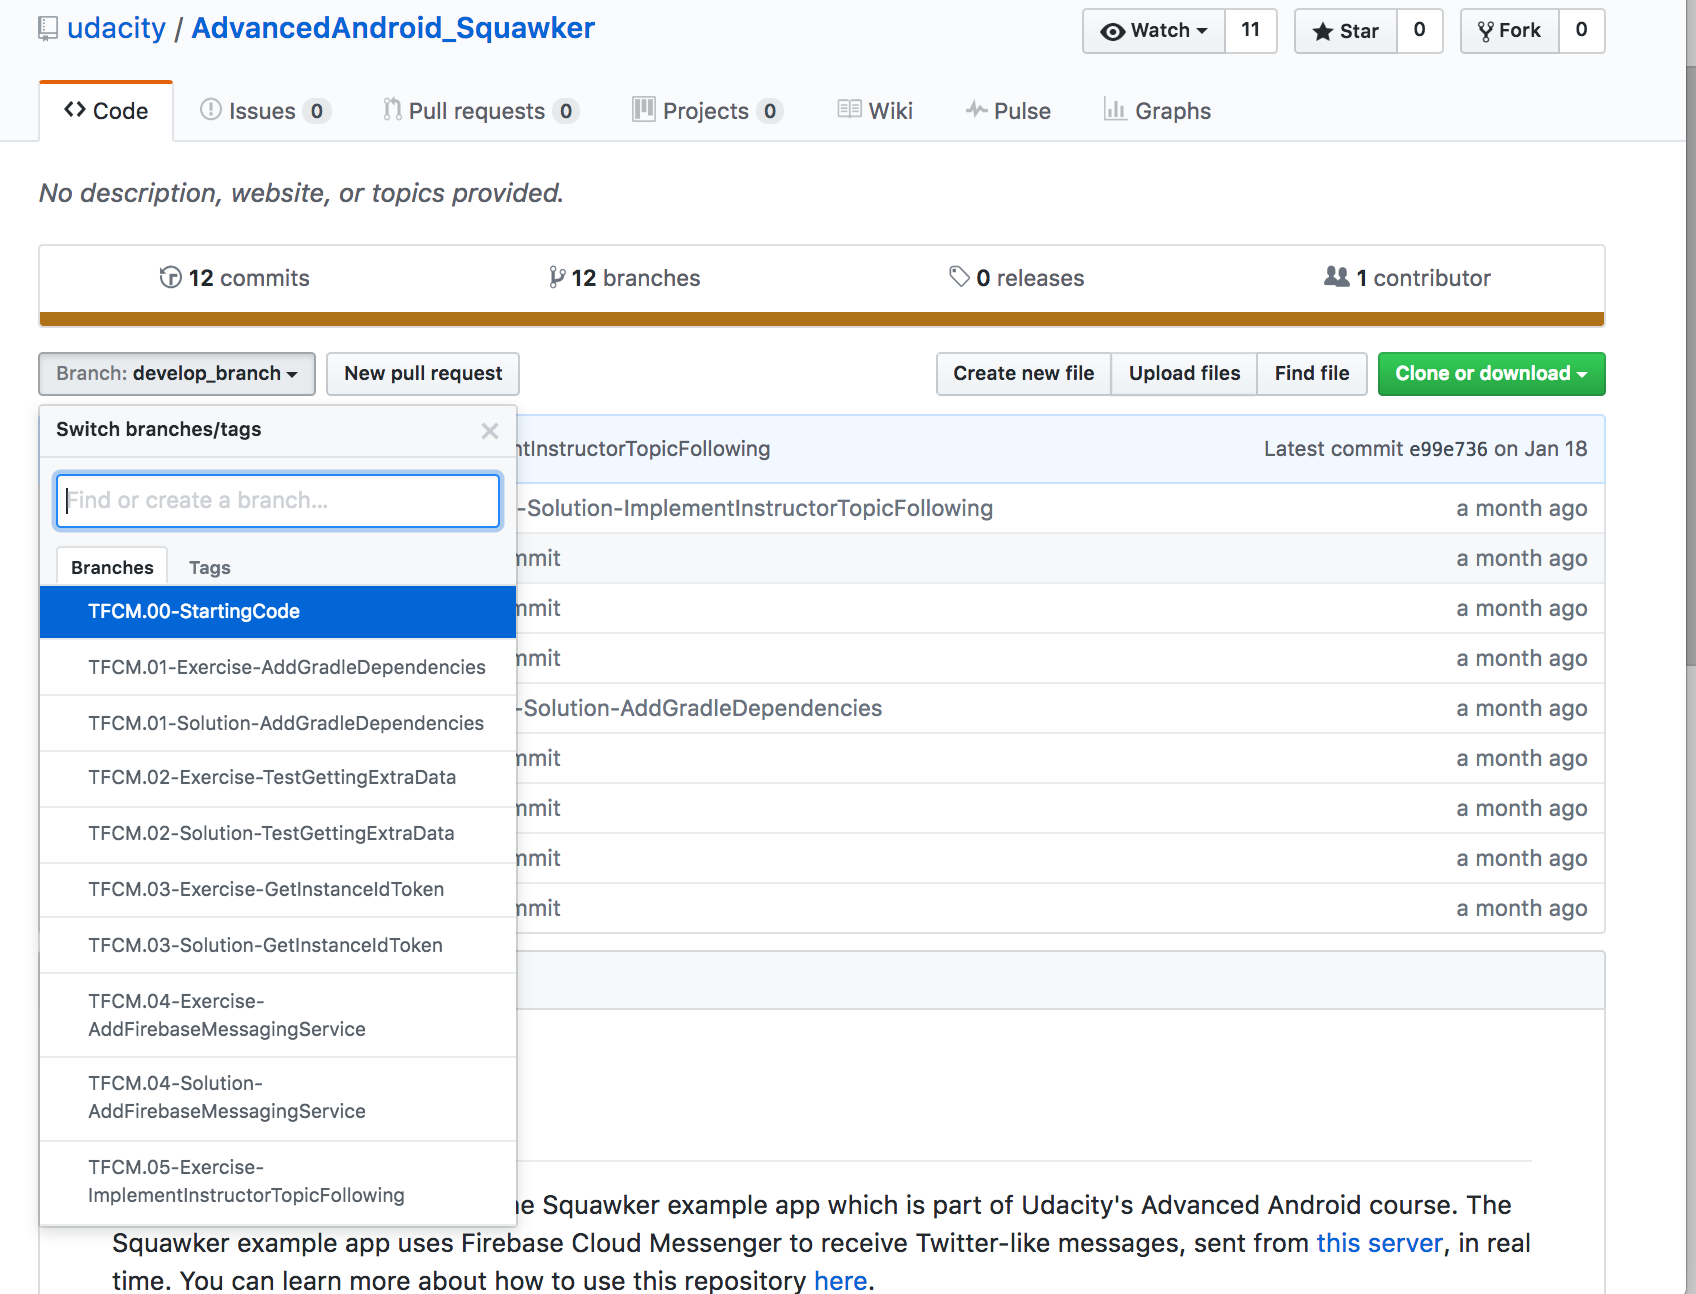
The branches are also accessible from the drop-down in the "Code" tab
Here are the basic steps for working with and completing exercises in the repo. This information is linked whenever you start a new exercise project, so don't feel you need to memorize all of this! In fact, skim it now, make sure that you know generally how to do the different tasks, and then come back when you start your first exercise.
The basic steps are:
Step 1: Clone the repo
As you go through the course, you'll be instructed to clone the different exercise repositories, so you don't need to set these up now. You can clone a repository from github in a folder of your choice with the command:
git clone https://github.com/udacity/REPOSITORY_NAME.git
Step 2: Checkout the exercise branch
As you do different exercises in the code, you'll be told which exercise you're on, as seen below:

To complete an exercise, you'll want to check out the branch associated with that exercise. For the exercise above, the command to check out that branch would be:
git checkout TFCM.01-Exercise-AddGradleDependencies
Step 3: Find and complete the TODOs
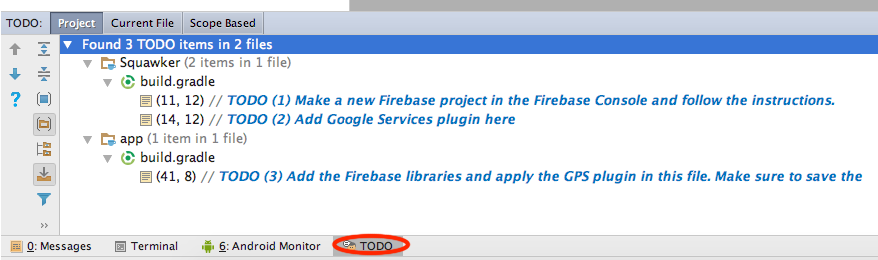
This branch should always have Exercise in the title. Once you've checked out the branch, you'll have the code in the exact state you need. You'll even have TODOs, which are special comments that tell you all the steps you need to complete the exercise. You can easily navigate to all the TODOs using Android Studio's TODO tool. To open the TODO tool, click the button at the bottom of the screen that says TODO. This will display a list of all comments with TODO in the project.
We've numbered the TODO steps so you can do them in order:

Step 4: Optionally commit your code changes
After You've completed the TODOs, you can optionally commit your changes. This will allow you to see the code you wrote whenever you return to the branch. The following git code will add and save all your changes.
git add .
git commit -m "Your commit message"
Step 5: Compare with the solution
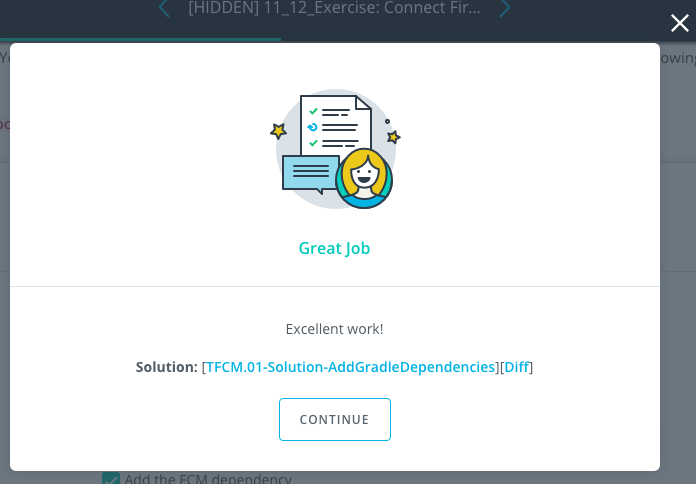
Most exercises will have a list of steps for you to check off in the classroom. Once you've checked these off, you'll see a pop up window with a link to the solution code. Note the Diff link:

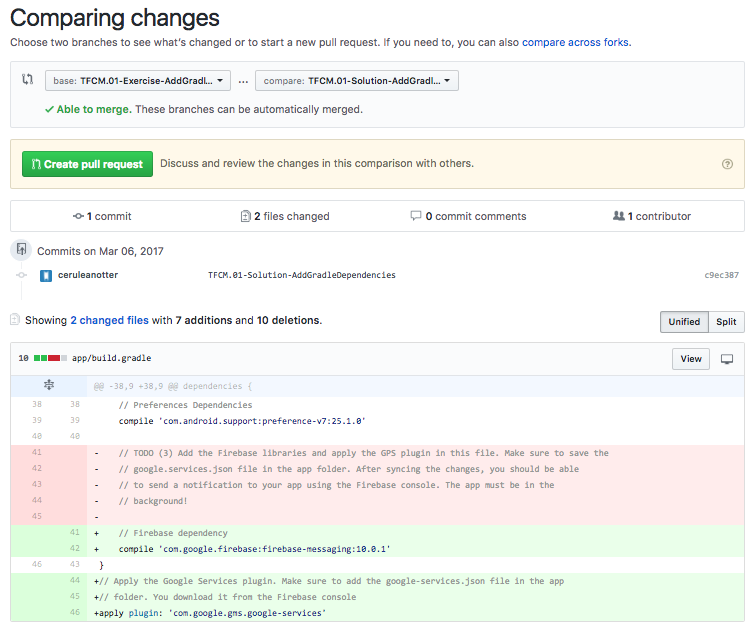
The Diff link will take you to a Github diff as seen below:

All of the code that was added in the solution is in green, and the removed code (which will usually be the TODO comments) is in red.
Notice any issues with a repository? Please file a github issue in the repository.
This repository is deprecated; therefore, we are going to archive it. However, learners will be able to fork it to their personal Github account but cannot submit PRs to this repository. If you have any issues or suggestions to make, feel free to:
Selected from shared topics, language and repository description—not editorial ratings.
ECLaboratorio /
BubbleShowCase is a framework that let you to use informative bubbles to help your users pointing out different App features.
79/100 healthappdevforall /
Code on the Go is an IDE that lets you build Android apps on Android phones, without a laptop computer and without Internet access. Code on the Go is a project of App Dev for All.
74/100 healthrramatchandran /
# big-o-performance A simple html app to demonstrate performance costs of data structures. - Clone the project - Navigate to the root of the project in a termina or command prompt - Run 'npm install' - Run 'npm start' - Go to the URL specified in the terminal or command prompt to try out the app. # This app was created from the Create React App NPM. Below are instructions from that project. Below you will find some information on how to perform common tasks. You can find the most recent version of this guide [here](https://github.com/facebookincubator/create-react-app/blob/master/template/README.md). ## Table of Contents - [Updating to New Releases](#updating-to-new-releases) - [Sending Feedback](#sending-feedback) - [Folder Structure](#folder-structure) - [Available Scripts](#available-scripts) - [npm start](#npm-start) - [npm run build](#npm-run-build) - [npm run eject](#npm-run-eject) - [Displaying Lint Output in the Editor](#displaying-lint-output-in-the-editor) - [Installing a Dependency](#installing-a-dependency) - [Importing a Component](#importing-a-component) - [Adding a Stylesheet](#adding-a-stylesheet) - [Post-Processing CSS](#post-processing-css) - [Adding Images and Fonts](#adding-images-and-fonts) - [Adding Bootstrap](#adding-bootstrap) - [Adding Flow](#adding-flow) - [Adding Custom Environment Variables](#adding-custom-environment-variables) - [Integrating with a Node Backend](#integrating-with-a-node-backend) - [Proxying API Requests in Development](#proxying-api-requests-in-development) - [Deployment](#deployment) - [Now](#now) - [Heroku](#heroku) - [Surge](#surge) - [GitHub Pages](#github-pages) - [Something Missing?](#something-missing) ## Updating to New Releases Create React App is divided into two packages: * `create-react-app` is a global command-line utility that you use to create new projects. * `react-scripts` is a development dependency in the generated projects (including this one). You almost never need to update `create-react-app` itself: it’s delegates all the setup to `react-scripts`. When you run `create-react-app`, it always creates the project with the latest version of `react-scripts` so you’ll get all the new features and improvements in newly created apps automatically. To update an existing project to a new version of `react-scripts`, [open the changelog](https://github.com/facebookincubator/create-react-app/blob/master/CHANGELOG.md), find the version you’re currently on (check `package.json` in this folder if you’re not sure), and apply the migration instructions for the newer versions. In most cases bumping the `react-scripts` version in `package.json` and running `npm install` in this folder should be enough, but it’s good to consult the [changelog](https://github.com/facebookincubator/create-react-app/blob/master/CHANGELOG.md) for potential breaking changes. We commit to keeping the breaking changes minimal so you can upgrade `react-scripts` painlessly. ## Sending Feedback We are always open to [your feedback](https://github.com/facebookincubator/create-react-app/issues). ## Folder Structure After creation, your project should look like this: ``` my-app/ README.md index.html favicon.ico node_modules/ package.json src/ App.css App.js index.css index.js logo.svg ``` For the project to build, **these files must exist with exact filenames**: * `index.html` is the page template; * `favicon.ico` is the icon you see in the browser tab; * `src/index.js` is the JavaScript entry point. You can delete or rename the other files. You may create subdirectories inside `src`. For faster rebuilds, only files inside `src` are processed by Webpack. You need to **put any JS and CSS files inside `src`**, or Webpack won’t see them. You can, however, create more top-level directories. They will not be included in the production build so you can use them for things like documentation. ## Available Scripts In the project directory, you can run: ### `npm start` Runs the app in the development mode.<br> Open [http://localhost:3000](http://localhost:3000) to view it in the browser. The page will reload if you make edits.<br> You will also see any lint errors in the console. ### `npm run build` Builds the app for production to the `build` folder.<br> It correctly bundles React in production mode and optimizes the build for the best performance. The build is minified and the filenames include the hashes.<br> Your app is ready to be deployed! ### `npm run eject` **Note: this is a one-way operation. Once you `eject`, you can’t go back!** If you aren’t satisfied with the build tool and configuration choices, you can `eject` at any time. This command will remove the single build dependency from your project. Instead, it will copy all the configuration files and the transitive dependencies (Webpack, Babel, ESLint, etc) right into your project so you have full control over them. All of the commands except `eject` will still work, but they will point to the copied scripts so you can tweak them. At this point you’re on your own. You don’t have to ever use `eject`. The curated feature set is suitable for small and middle deployments, and you shouldn’t feel obligated to use this feature. However we understand that this tool wouldn’t be useful if you couldn’t customize it when you are ready for it. ## Displaying Lint Output in the Editor >Note: this feature is available with `react-scripts@0.2.0` and higher. Some editors, including Sublime Text, Atom, and Visual Studio Code, provide plugins for ESLint. They are not required for linting. You should see the linter output right in your terminal as well as the browser console. However, if you prefer the lint results to appear right in your editor, there are some extra steps you can do. You would need to install an ESLint plugin for your editor first. >**A note for Atom `linter-eslint` users** >If you are using the Atom `linter-eslint` plugin, make sure that **Use global ESLint installation** option is checked: ><img src="http://i.imgur.com/yVNNHJM.png" width="300"> Then make sure `package.json` of your project ends with this block: ```js { // ... "eslintConfig": { "extends": "./node_modules/react-scripts/config/eslint.js" } } ``` Projects generated with `react-scripts@0.2.0` and higher should already have it. If you don’t need ESLint integration with your editor, you can safely delete those three lines from your `package.json`. Finally, you will need to install some packages *globally*: ```sh npm install -g eslint babel-eslint eslint-plugin-react eslint-plugin-import eslint-plugin-jsx-a11y eslint-plugin-flowtype ``` We recognize that this is suboptimal, but it is currently required due to the way we hide the ESLint dependency. The ESLint team is already [working on a solution to this](https://github.com/eslint/eslint/issues/3458) so this may become unnecessary in a couple of months. ## Installing a Dependency The generated project includes React and ReactDOM as dependencies. It also includes a set of scripts used by Create React App as a development dependency. You may install other dependencies (for example, React Router) with `npm`: ``` npm install --save <library-name> ``` ## Importing a Component This project setup supports ES6 modules thanks to Babel. While you can still use `require()` and `module.exports`, we encourage you to use [`import` and `export`](http://exploringjs.com/es6/ch_modules.html) instead. For example: ### `Button.js` ```js import React, { Component } from 'react'; class Button extends Component { render() { // ... } } export default Button; // Don’t forget to use export default! ``` ### `DangerButton.js` ```js import React, { Component } from 'react'; import Button from './Button'; // Import a component from another file class DangerButton extends Component { render() { return <Button color="red" />; } } export default DangerButton; ``` Be aware of the [difference between default and named exports](http://stackoverflow.com/questions/36795819/react-native-es-6-when-should-i-use-curly-braces-for-import/36796281#36796281). It is a common source of mistakes. We suggest that you stick to using default imports and exports when a module only exports a single thing (for example, a component). That’s what you get when you use `export default Button` and `import Button from './Button'`. Named exports are useful for utility modules that export several functions. A module may have at most one default export and as many named exports as you like. Learn more about ES6 modules: * [When to use the curly braces?](http://stackoverflow.com/questions/36795819/react-native-es-6-when-should-i-use-curly-braces-for-import/36796281#36796281) * [Exploring ES6: Modules](http://exploringjs.com/es6/ch_modules.html) * [Understanding ES6: Modules](https://leanpub.com/understandinges6/read#leanpub-auto-encapsulating-code-with-modules) ## Adding a Stylesheet This project setup uses [Webpack](https://webpack.github.io/) for handling all assets. Webpack offers a custom way of “extending” the concept of `import` beyond JavaScript. To express that a JavaScript file depends on a CSS file, you need to **import the CSS from the JavaScript file**: ### `Button.css` ```css .Button { padding: 20px; } ``` ### `Button.js` ```js import React, { Component } from 'react'; import './Button.css'; // Tell Webpack that Button.js uses these styles class Button extends Component { render() { // You can use them as regular CSS styles return <div className="Button" />; } } ``` **This is not required for React** but many people find this feature convenient. You can read about the benefits of this approach [here](https://medium.com/seek-ui-engineering/block-element-modifying-your-javascript-components-d7f99fcab52b). However you should be aware that this makes your code less portable to other build tools and environments than Webpack. In development, expressing dependencies this way allows your styles to be reloaded on the fly as you edit them. In production, all CSS files will be concatenated into a single minified `.css` file in the build output. If you are concerned about using Webpack-specific semantics, you can put all your CSS right into `src/index.css`. It would still be imported from `src/index.js`, but you could always remove that import if you later migrate to a different build tool. ## Post-Processing CSS This project setup minifies your CSS and adds vendor prefixes to it automatically through [Autoprefixer](https://github.com/postcss/autoprefixer) so you don’t need to worry about it. For example, this: ```css .App { display: flex; flex-direction: row; align-items: center; } ``` becomes this: ```css .App { display: -webkit-box; display: -ms-flexbox; display: flex; -webkit-box-orient: horizontal; -webkit-box-direction: normal; -ms-flex-direction: row; flex-direction: row; -webkit-box-align: center; -ms-flex-align: center; align-items: center; } ``` There is currently no support for preprocessors such as Less, or for sharing variables across CSS files. ## Adding Images and Fonts With Webpack, using static assets like images and fonts works similarly to CSS. You can **`import` an image right in a JavaScript module**. This tells Webpack to include that image in the bundle. Unlike CSS imports, importing an image or a font gives you a string value. This value is the final image path you can reference in your code. Here is an example: ```js import React from 'react'; import logo from './logo.png'; // Tell Webpack this JS file uses this image console.log(logo); // /logo.84287d09.png function Header() { // Import result is the URL of your image return <img src={logo} alt="Logo" />; } export default function Header; ``` This works in CSS too: ```css .Logo { background-image: url(./logo.png); } ``` Webpack finds all relative module references in CSS (they start with `./`) and replaces them with the final paths from the compiled bundle. If you make a typo or accidentally delete an important file, you will see a compilation error, just like when you import a non-existent JavaScript module. The final filenames in the compiled bundle are generated by Webpack from content hashes. If the file content changes in the future, Webpack will give it a different name in production so you don’t need to worry about long-term caching of assets. Please be advised that this is also a custom feature of Webpack. **It is not required for React** but many people enjoy it (and React Native uses a similar mechanism for images). However it may not be portable to some other environments, such as Node.js and Browserify. If you prefer to reference static assets in a more traditional way outside the module system, please let us know [in this issue](https://github.com/facebookincubator/create-react-app/issues/28), and we will consider support for this. ## Adding Bootstrap You don’t have to use [React Bootstrap](https://react-bootstrap.github.io) together with React but it is a popular library for integrating Bootstrap with React apps. If you need it, you can integrate it with Create React App by following these steps: Install React Bootstrap and Bootstrap from NPM. React Bootstrap does not include Bootstrap CSS so this needs to be installed as well: ``` npm install react-bootstrap --save npm install bootstrap@3 --save ``` Import Bootstrap CSS and optionally Bootstrap theme CSS in the ```src/index.js``` file: ```js import 'bootstrap/dist/css/bootstrap.css'; import 'bootstrap/dist/css/bootstrap-theme.css'; ``` Import required React Bootstrap components within ```src/App.js``` file or your custom component files: ```js import { Navbar, Jumbotron, Button } from 'react-bootstrap'; ``` Now you are ready to use the imported React Bootstrap components within your component hierarchy defined in the render method. Here is an example [`App.js`](https://gist.githubusercontent.com/gaearon/85d8c067f6af1e56277c82d19fd4da7b/raw/6158dd991b67284e9fc8d70b9d973efe87659d72/App.js) redone using React Bootstrap. ## Adding Flow Flow typing is currently [not supported out of the box](https://github.com/facebookincubator/create-react-app/issues/72) with the default `.flowconfig` generated by Flow. If you run it, you might get errors like this: ```js node_modules/fbjs/lib/Deferred.js.flow:60 60: Promise.prototype.done.apply(this._promise, arguments); ^^^^ property `done`. Property not found in 495: declare class Promise<+R> { ^ Promise. See lib: /private/tmp/flow/flowlib_34952d31/core.js:495 node_modules/fbjs/lib/shallowEqual.js.flow:29 29: return x !== 0 || 1 / (x: $FlowIssue) === 1 / (y: $FlowIssue); ^^^^^^^^^^ identifier `$FlowIssue`. Could not resolve name src/App.js:3 3: import logo from './logo.svg'; ^^^^^^^^^^^^ ./logo.svg. Required module not found src/App.js:4 4: import './App.css'; ^^^^^^^^^^^ ./App.css. Required module not found src/index.js:5 5: import './index.css'; ^^^^^^^^^^^^^ ./index.css. Required module not found ``` To fix this, change your `.flowconfig` to look like this: ```ini [libs] ./node_modules/fbjs/flow/lib [options] esproposal.class_static_fields=enable esproposal.class_instance_fields=enable module.name_mapper='^\(.*\)\.css$' -> 'react-scripts/config/flow/css' module.name_mapper='^\(.*\)\.\(jpg\|png\|gif\|eot\|otf\|webp\|svg\|ttf\|woff\|woff2\|mp4\|webm\)$' -> 'react-scripts/config/flow/file' suppress_type=$FlowIssue suppress_type=$FlowFixMe ``` Re-run flow, and you shouldn’t get any extra issues. If you later `eject`, you’ll need to replace `react-scripts` references with the `<PROJECT_ROOT>` placeholder, for example: ```ini module.name_mapper='^\(.*\)\.css$' -> '<PROJECT_ROOT>/config/flow/css' module.name_mapper='^\(.*\)\.\(jpg\|png\|gif\|eot\|otf\|webp\|svg\|ttf\|woff\|woff2\|mp4\|webm\)$' -> '<PROJECT_ROOT>/config/flow/file' ``` We will consider integrating more tightly with Flow in the future so that you don’t have to do this. ## Adding Custom Environment Variables >Note: this feature is available with `react-scripts@0.2.3` and higher. Your project can consume variables declared in your environment as if they were declared locally in your JS files. By default you will have `NODE_ENV` defined for you, and any other environment variables starting with `REACT_APP_`. These environment variables will be defined for you on `process.env`. For example, having an environment variable named `REACT_APP_SECRET_CODE` will be exposed in your JS as `process.env.REACT_APP_SECRET_CODE`, in addition to `process.env.NODE_ENV`. These environment variables can be useful for displaying information conditionally based on where the project is deployed or consuming sensitive data that lives outside of version control. First, you need to have environment variables defined, which can vary between OSes. For example, let's say you wanted to consume a secret defined in the environment inside a `<form>`: ```jsx render() { return ( <div> <small>You are running this application in <b>{process.env.NODE_ENV}</b> mode.</small> <form> <input type="hidden" defaultValue={process.env.REACT_APP_SECRET_CODE} /> </form> </div> ); } ``` The above form is looking for a variable called `REACT_APP_SECRET_CODE` from the environment. In order to consume this value, we need to have it defined in the environment: ### Windows (cmd.exe) ```cmd set REACT_APP_SECRET_CODE=abcdef&&npm start ``` (Note: the lack of whitespace is intentional.) ### Linux, OS X (Bash) ```bash REACT_APP_SECRET_CODE=abcdef npm start ``` > Note: Defining environment variables in this manner is temporary for the life of the shell session. Setting permanent environment variables is outside the scope of these docs. With our environment variable defined, we start the app and consume the values. Remember that the `NODE_ENV` variable will be set for you automatically. When you load the app in the browser and inspect the `<input>`, you will see its value set to `abcdef`, and the bold text will show the environment provided when using `npm start`: ```html <div> <small>You are running this application in <b>development</b> mode.</small> <form> <input type="hidden" value="abcdef" /> </form> </div> ``` Having access to the `NODE_ENV` is also useful for performing actions conditionally: ```js if (process.env.NODE_ENV !== 'production') { analytics.disable(); } ``` ## Integrating with a Node Backend Check out [this tutorial](https://www.fullstackreact.com/articles/using-create-react-app-with-a-server/) for instructions on integrating an app with a Node backend running on another port, and using `fetch()` to access it. You can find the companion GitHub repository [here](https://github.com/fullstackreact/food-lookup-demo). ## Proxying API Requests in Development >Note: this feature is available with `react-scripts@0.2.3` and higher. People often serve the front-end React app from the same host and port as their backend implementation. For example, a production setup might look like this after the app is deployed: ``` / - static server returns index.html with React app /todos - static server returns index.html with React app /api/todos - server handles any /api/* requests using the backend implementation ``` Such setup is **not** required. However, if you **do** have a setup like this, it is convenient to write requests like `fetch('/api/todos')` without worrying about redirecting them to another host or port during development. To tell the development server to proxy any unknown requests to your API server in development, add a `proxy` field to your `package.json`, for example: ```js "proxy": "http://localhost:4000", ``` This way, when you `fetch('/api/todos')` in development, the development server will recognize that it’s not a static asset, and will proxy your request to `http://localhost:4000/api/todos` as a fallback. Conveniently, this avoids [CORS issues](http://stackoverflow.com/questions/21854516/understanding-ajax-cors-and-security-considerations) and error messages like this in development: ``` Fetch API cannot load http://localhost:4000/api/todos. No 'Access-Control-Allow-Origin' header is present on the requested resource. Origin 'http://localhost:3000' is therefore not allowed access. If an opaque response serves your needs, set the request's mode to 'no-cors' to fetch the resource with CORS disabled. ``` Keep in mind that `proxy` only has effect in development (with `npm start`), and it is up to you to ensure that URLs like `/api/todos` point to the right thing in production. You don’t have to use the `/api` prefix. Any unrecognized request will be redirected to the specified `proxy`. Currently the `proxy` option only handles HTTP requests, and it won’t proxy WebSocket connections. If the `proxy` option is **not** flexible enough for you, alternatively you can: * Enable CORS on your server ([here’s how to do it for Express](http://enable-cors.org/server_expressjs.html)). * Use [environment variables](#adding-custom-environment-variables) to inject the right server host and port into your app. ## Deployment By default, Create React App produces a build assuming your app is hosted at the server root. To override this, specify the `homepage` in your `package.json`, for example: ```js "homepage": "http://mywebsite.com/relativepath", ``` This will let Create React App correctly infer the root path to use in the generated HTML file. ### Now See [this example](https://github.com/xkawi/create-react-app-now) for a zero-configuration single-command deployment with [now](https://zeit.co/now). ### Heroku Use the [Heroku Buildpack for Create React App](https://github.com/mars/create-react-app-buildpack). You can find instructions in [Deploying React with Zero Configuration](https://blog.heroku.com/deploying-react-with-zero-configuration). ### Surge Install the Surge CLI if you haven't already by running `npm install -g surge`. Run the `surge` command and log in you or create a new account. You just need to specify the *build* folder and your custom domain, and you are done. ```sh email: email@domain.com password: ******** project path: /path/to/project/build size: 7 files, 1.8 MB domain: create-react-app.surge.sh upload: [====================] 100%, eta: 0.0s propagate on CDN: [====================] 100% plan: Free users: email@domain.com IP Address: X.X.X.X Success! Project is published and running at create-react-app.surge.sh ``` Note that in order to support routers that use html5 `pushState` API, you may want to rename the `index.html` in your build folder to `200.html` before deploying to Surge. This [ensures that every URL falls back to that file](https://surge.sh/help/adding-a-200-page-for-client-side-routing). ### GitHub Pages >Note: this feature is available with `react-scripts@0.2.0` and higher. Open your `package.json` and add a `homepage` field: ```js "homepage": "http://myusername.github.io/my-app", ``` **The above step is important!** Create React App uses the `homepage` field to determine the root URL in the built HTML file. Now, whenever you run `npm run build`, you will see a cheat sheet with a sequence of commands to deploy to GitHub pages: ```sh git commit -am "Save local changes" git checkout -B gh-pages git add -f build git commit -am "Rebuild website" git filter-branch -f --prune-empty --subdirectory-filter build git push -f origin gh-pages git checkout - ``` You may copy and paste them, or put them into a custom shell script. You may also customize them for another hosting provider. Note that GitHub Pages doesn't support routers that use the HTML5 `pushState` history API under the hood (for example, React Router using `browserHistory`). This is because when there is a fresh page load for a url like `http://user.github.io/todomvc/todos/42`, where `/todos/42` is a frontend route, the GitHub Pages server returns 404 because it knows nothing of `/todos/42`. If you want to add a router to a project hosted on GitHub Pages, here are a couple of solutions: * You could switch from using HTML5 history API to routing with hashes. If you use React Router, you can switch to `hashHistory` for this effect, but the URL will be longer and more verbose (for example, `http://user.github.io/todomvc/#/todos/42?_k=yknaj`). [Read more](https://github.com/reactjs/react-router/blob/master/docs/guides/Histories.md#histories) about different history implementations in React Router. * Alternatively, you can use a trick to teach GitHub Pages to handle 404 by redirecting to your `index.html` page with a special redirect parameter. You would need to add a `404.html` file with the redirection code to the `build` folder before deploying your project, and you’ll need to add code handling the redirect parameter to `index.html`. You can find a detailed explanation of this technique [in this guide](https://github.com/rafrex/spa-github-pages). ## Something Missing? If you have ideas for more “How To” recipes that should be on this page, [let us know](https://github.com/facebookincubator/create-react-app/issues) or [contribute some!](https://github.com/facebookincubator/create-react-app/edit/master/template/README.md)
61/100 healthsanusanth /
What is C#? C# is pronounced "C-Sharp". It is an object-oriented programming language created by Microsoft that runs on the .NET Framework. C# has roots from the C family, and the language is close to other popular languages like C++ and Java. The first version was released in year 2002. The latest version, C# 8, was released in September 2019. C# is a modern object-oriented programming language developed in 2000 by Anders Hejlsberg, the principal designer and lead architect at Microsoft. It is pronounced as "C-Sharp," inspired by the musical notation “♯” which stands for a note with a slightly higher pitch. As it’s considered an incremental compilation of the C++ language, the name C “sharp” seemed most appropriate. The sharp symbol, however, has been replaced by the keyboard friendly “#” as a suffix to “C” for purposes of programming. Although the code is very similar to C++, C# is newer and has grown fast with extensive support from Microsoft. The fact that it’s so similar to Java syntactically helps explain why it has emerged as one of the most popular programming languages today. C# is pronounced "C-Sharp". It is an object-oriented programming language created by Microsoft that runs on the .NET Framework. C# has roots from the C family, and the language is close to other popular languages like C++ and Java. The first version was released in year 2002. The latest version, C# 8, was released in September 2019. C# is used for: Mobile applications Desktop applications Web applications Web services Web sites Games VR Database applications And much, much more! An Introduction to C# Programming C# is a general-purpose, object-oriented programming language that is structured and easy to learn. It runs on Microsoft’s .Net Framework and can be compiled on a variety of computer platforms. As the syntax is simple and easy to learn, developers familiar with C, C++, or Java have found a comfort zone within C#. C# is a boon for developers who want to build a wide range of applications on the .NET Framework—Windows applications, Web applications, and Web services—in addition to building mobile apps, Windows Store apps, and enterprise software. It is thus considered a powerful programming language and features in every developer’s cache of tools. Although first released in 2002, when it was introduced with .NET Framework 1.0, the C# language has evolved a great deal since then. The most recent version is C# 8.0, available in preview as part of Visual Studio. To get access to all of the new language features, you would need to install the latest preview version of .NET Core 3.0. C# is used for: Mobile applications Desktop applications Web applications Web services Web sites Games VR Database applications And much, much more! Why Use C#? It is one of the most popular programming language in the world It is easy to learn and simple to use It has a huge community support C# is an object oriented language which gives a clear structure to programs and allows code to be reused, lowering development costs. As C# is close to C, C++ and Java, it makes it easy for programmers to switch to C# or vice versa. The C# Environment You need the .NET Framework and an IDE (integrated development environment) to work with the C# language. The .NET Framework The .NET Framework platform of the Windows OS is required to write web and desktop-based applications using not only C# but also Visual Basic and Jscript, as the platform provides language interoperability. Besides, the .Net Framework allows C# to communicate with any of the other common languages, such as C++, Jscript, COBOL, and so on. IDEs Microsoft provides various IDEs for C# programming: Visual Studio 2010 (VS) Visual Studio Express Visual Web Developer Visual Studio Code (VSC) The C# source code files can be written using a basic text editor, like Notepad, and compiled using the command-line compiler of the .NET Framework. Alternative open-source versions of the .Net Framework can work on other operating systems as well. For instance, the Mono has a C# compiler and runs on several operating systems, including Linux, Mac, Android, BSD, iOS, Windows, Solaris, and UNIX. This brings enhanced development tools to the developer. As C# is part of the .Net Framework platform, it has access to its enormous library of codes and components, such as Common Language Runtime (CLR), the .Net Framework Class Library, Common Language Specification, Common Type System, Metadata and Assemblies, Windows Forms, ASP.Net and ASP.Net AJAX, Windows Workflow Foundation (WF), Windows Communication Foundation (WCF), and LINQ. C# and Java C# and Java are high-level programming languages that share several similarities (as well as many differences). They are both object-oriented languages much influenced by C++. But while C# is suitable for application development in the Microsoft ecosystem from the front, Java is considered best for client-side web applications. Also, while C# has many tools for programming, Java has a larger arsenal of tools to choose from in IDEs and Text Editors. C# is used for virtual reality projects like games, mobile, and web applications. It is built specifically for Microsoft platforms and several non-Microsoft-based operating systems, like the Mono Project that works with Linux and OS X. Java is used for creating messaging applications and developing web-based and enterprise-based applications in open-source ecosystems. Both C# and Java support arrays. However, each language uses them differently. In C#, arrays are a specialization of the system; in Java, they are a direct specialization of the object. The C# programming language executes on the CLR. The source code is interpreted into bytecode, which is further compiled by the CLR. Java runs on any platform with the assistance of JRE (Java Runtime Environment). The written source code is first compiled into bytecode and then converted into machine code to be executed on a JRE. C# and C++ Although C# and C++ are both C-based languages with similar code, there are some differences. For one, C# is considered a component-oriented programming language, while C++ is a partial object-oriented language. Also, while both languages are compiled languages, C# compiles to CLR and is interpreted by.NET, but C++ compiles to machine code. The size of binaries in C# is much larger than in C++. Other differences between the two include the following: C# gives compiler errors and warnings, but C++ doesn’t support warnings, which may cause damage to the OS. C# runs in a virtual machine for automatic memory management. C++ requires you to manage memory manually. C# can create Windows, .NET, web, desktop, and mobile applications, but not stand-alone apps. C++ can create server-side, stand-alone, and console applications as it can work directly with the hardware. C++ can be used on any platform, while C# is targeted toward Windows OS. Generally, C++ being faster than C#, the former is preferred for applications where performance is essential. Features of C# The C# programming language has many features that make it more useful and unique when compared to other languages, including: Object-oriented language Being object-oriented, C# allows the creation of modular applications and reusable codes, an advantage over C++. As an object-oriented language, C# makes development and maintenance easier when project size grows. It supports all three object-oriented features: data encapsulation, inheritance, interfaces, and polymorphism. Simplicity C# is a simple language with a structured approach to problem-solving. Unsafe operations, like direct memory manipulation, are not allowed. Speed The compilation and execution time in C# is very powerful and fast. A Modern programming language C# programming is used for building scalable and interoperable applications with support for modern features like automatic garbage collection, error handling, debugging, and robust security. It has built-in support for a web service to be invoked from any app running on any platform. Type-safe Arrays and objects are zero base indexed and bound checked. There is an automatic checking of the overflow of types. The C# type safety instances support robust programming. Interoperability Language interoperability of C# maximizes code reuse for the efficiency of the development process. C# programs can work upon almost anything as a program can call out any native API. Consistency Its unified type system enables developers to extend the type system simply and easily for consistent behavior. Updateable C# is automatically updateable. Its versioning support enables complex frameworks to be developed and evolved. Component oriented C# supports component-oriented programming through the concepts of properties, methods, events, and attributes for self-contained and self-describing components of functionality for robust and scalable applications. Structured Programming Language The structured design and modularization in C# break a problem into parts, using functions for easy implementation to solve significant problems. Rich Library C# has a standard library with many inbuilt functions for easy and fast development. Prerequisites for Learning C# Basic knowledge of C or C++ or any programming language or programming fundamentals. Additionally, the OOP concept makes for a short learning curve of C#. Advantages of C# There are many advantages to the C# language that makes it a useful programming language compared to other languages like Java, C, or C++. These include: Being an object-oriented language, C# allows you to create modular, maintainable applications and reusable codes Familiar syntax Easy to develop as it has a rich class of libraries for smooth implementation of functions Enhanced integration as an application written in .NET will integrate and interpret better when compared to other NET technologies As C# runs on CLR, it makes it easy to integrate with components written in other languages It’s safe, with no data loss as there is no type-conversion so that you can write secure codes The automatic garbage collection keeps the system clean and doesn’t hang it during execution As your machine has to install the .NET Framework to run C#, it supports cross-platform Strong memory backup prevents memory leakage Programming support of the Microsoft ecosystem makes development easy and seamless Low maintenance cost, as C# can develop iOS, Android, and Windows Phone native apps The syntax is similar to C, C++, and Java, which makes it easier to learn and work with C# Useful as it can develop iOS, Android, and Windows Phone native apps with the Xamarin Framework C# is the most powerful programming language for the .NET Framework Fast development as C# is open source steered by Microsoft with access to open source projects and tools on Github, and many active communities contributing to the improvement What Can C Sharp Do for You? C# can be used to develop a wide range of: Windows client applications Windows libraries and components Windows services Web applications Native iOS and Android mobile apps Azure cloud applications and services Gaming consoles and gaming systems Video and virtual reality games Interoperability software like SharePoint Enterprise software Backend services and database programs AI and ML applications Distributed applications Hardware-level programming Virus and malware software GUI-based applications IoT devices Blockchain and distributed ledger technology C# Programming for Beginners: Introduction, Features and Applications By Simplilearn Last updated on Jan 20, 2020674 C# Programming for Beginners As a programmer, you’re motivated to master the most popular languages that will give you an edge in your career. There’s a vast number of programming languages that you can learn, but how do you know which is the most useful? If you know C and C++, do you need to learn C# as well? How similar is C# to Java? Does it become more comfortable for you to learn C# if you already know Java? Every developer and wannabe programmer asks these types of questions. So let us explore C# programming: how it evolved as an extension of C and why you need to learn it as a part of the Master’s Program in integrated DevOps for server-side execution. Are you a web developer or someone interested to build a website? Enroll for the Javascript Certification Training. Check out the course preview now! What is C#? C# is a modern object-oriented programming language developed in 2000 by Anders Hejlsberg, the principal designer and lead architect at Microsoft. It is pronounced as "C-Sharp," inspired by the musical notation “♯” which stands for a note with a slightly higher pitch. As it’s considered an incremental compilation of the C++ language, the name C “sharp” seemed most appropriate. The sharp symbol, however, has been replaced by the keyboard friendly “#” as a suffix to “C” for purposes of programming. Although the code is very similar to C++, C# is newer and has grown fast with extensive support from Microsoft. The fact that it’s so similar to Java syntactically helps explain why it has emerged as one of the most popular programming languages today. An Introduction to C# Programming C# is a general-purpose, object-oriented programming language that is structured and easy to learn. It runs on Microsoft’s .Net Framework and can be compiled on a variety of computer platforms. As the syntax is simple and easy to learn, developers familiar with C, C++, or Java have found a comfort zone within C#. C# is a boon for developers who want to build a wide range of applications on the .NET Framework—Windows applications, Web applications, and Web services—in addition to building mobile apps, Windows Store apps, and enterprise software. It is thus considered a powerful programming language and features in every developer’s cache of tools. Although first released in 2002, when it was introduced with .NET Framework 1.0, the C# language has evolved a great deal since then. The most recent version is C# 8.0, available in preview as part of Visual Studio. To get access to all of the new language features, you would need to install the latest preview version of .NET Core 3.0. The C# Environment You need the .NET Framework and an IDE (integrated development environment) to work with the C# language. The .NET Framework The .NET Framework platform of the Windows OS is required to write web and desktop-based applications using not only C# but also Visual Basic and Jscript, as the platform provides language interoperability. Besides, the .Net Framework allows C# to communicate with any of the other common languages, such as C++, Jscript, COBOL, and so on. IDEs Microsoft provides various IDEs for C# programming: Visual Studio 2010 (VS) Visual Studio Express Visual Web Developer Visual Studio Code (VSC) The C# source code files can be written using a basic text editor, like Notepad, and compiled using the command-line compiler of the .NET Framework. Alternative open-source versions of the .Net Framework can work on other operating systems as well. For instance, the Mono has a C# compiler and runs on several operating systems, including Linux, Mac, Android, BSD, iOS, Windows, Solaris, and UNIX. This brings enhanced development tools to the developer. As C# is part of the .Net Framework platform, it has access to its enormous library of codes and components, such as Common Language Runtime (CLR), the .Net Framework Class Library, Common Language Specification, Common Type System, Metadata and Assemblies, Windows Forms, ASP.Net and ASP.Net AJAX, Windows Workflow Foundation (WF), Windows Communication Foundation (WCF), and LINQ. C# and Java C# and Java are high-level programming languages that share several similarities (as well as many differences). They are both object-oriented languages much influenced by C++. But while C# is suitable for application development in the Microsoft ecosystem from the front, Java is considered best for client-side web applications. Also, while C# has many tools for programming, Java has a larger arsenal of tools to choose from in IDEs and Text Editors. C# is used for virtual reality projects like games, mobile, and web applications. It is built specifically for Microsoft platforms and several non-Microsoft-based operating systems, like the Mono Project that works with Linux and OS X. Java is used for creating messaging applications and developing web-based and enterprise-based applications in open-source ecosystems. Both C# and Java support arrays. However, each language uses them differently. In C#, arrays are a specialization of the system; in Java, they are a direct specialization of the object. The C# programming language executes on the CLR. The source code is interpreted into bytecode, which is further compiled by the CLR. Java runs on any platform with the assistance of JRE (Java Runtime Environment). The written source code is first compiled into bytecode and then converted into machine code to be executed on a JRE. C# and C++ Although C# and C++ are both C-based languages with similar code, there are some differences. For one, C# is considered a component-oriented programming language, while C++ is a partial object-oriented language. Also, while both languages are compiled languages, C# compiles to CLR and is interpreted by.NET, but C++ compiles to machine code. The size of binaries in C# is much larger than in C++. Other differences between the two include the following: C# gives compiler errors and warnings, but C++ doesn’t support warnings, which may cause damage to the OS. C# runs in a virtual machine for automatic memory management. C++ requires you to manage memory manually. C# can create Windows, .NET, web, desktop, and mobile applications, but not stand-alone apps. C++ can create server-side, stand-alone, and console applications as it can work directly with the hardware. C++ can be used on any platform, while C# is targeted toward Windows OS. Generally, C++ being faster than C#, the former is preferred for applications where performance is essential. Features of C# The C# programming language has many features that make it more useful and unique when compared to other languages, including: Object-oriented language Being object-oriented, C# allows the creation of modular applications and reusable codes, an advantage over C++. As an object-oriented language, C# makes development and maintenance easier when project size grows. It supports all three object-oriented features: data encapsulation, inheritance, interfaces, and polymorphism. Simplicity C# is a simple language with a structured approach to problem-solving. Unsafe operations, like direct memory manipulation, are not allowed. Speed The compilation and execution time in C# is very powerful and fast. A Modern programming language C# programming is used for building scalable and interoperable applications with support for modern features like automatic garbage collection, error handling, debugging, and robust security. It has built-in support for a web service to be invoked from any app running on any platform. Type-safe Arrays and objects are zero base indexed and bound checked. There is an automatic checking of the overflow of types. The C# type safety instances support robust programming. Interoperability Language interoperability of C# maximizes code reuse for the efficiency of the development process. C# programs can work upon almost anything as a program can call out any native API. Consistency Its unified type system enables developers to extend the type system simply and easily for consistent behavior. Updateable C# is automatically updateable. Its versioning support enables complex frameworks to be developed and evolved. Component oriented C# supports component-oriented programming through the concepts of properties, methods, events, and attributes for self-contained and self-describing components of functionality for robust and scalable applications. Structured Programming Language The structured design and modularization in C# break a problem into parts, using functions for easy implementation to solve significant problems. Rich Library C# has a standard library with many inbuilt functions for easy and fast development. Full Stack Java Developer Course The Gateway to Master Web DevelopmentEXPLORE COURSEFull Stack Java Developer Course Prerequisites for Learning C# Basic knowledge of C or C++ or any programming language or programming fundamentals. Additionally, the OOP concept makes for a short learning curve of C#. Advantages of C# There are many advantages to the C# language that makes it a useful programming language compared to other languages like Java, C, or C++. These include: Being an object-oriented language, C# allows you to create modular, maintainable applications and reusable codes Familiar syntax Easy to develop as it has a rich class of libraries for smooth implementation of functions Enhanced integration as an application written in .NET will integrate and interpret better when compared to other NET technologies As C# runs on CLR, it makes it easy to integrate with components written in other languages It’s safe, with no data loss as there is no type-conversion so that you can write secure codes The automatic garbage collection keeps the system clean and doesn’t hang it during execution As your machine has to install the .NET Framework to run C#, it supports cross-platform Strong memory backup prevents memory leakage Programming support of the Microsoft ecosystem makes development easy and seamless Low maintenance cost, as C# can develop iOS, Android, and Windows Phone native apps The syntax is similar to C, C++, and Java, which makes it easier to learn and work with C# Useful as it can develop iOS, Android, and Windows Phone native apps with the Xamarin Framework C# is the most powerful programming language for the .NET Framework Fast development as C# is open source steered by Microsoft with access to open source projects and tools on Github, and many active communities contributing to the improvement What Can C Sharp Do for You? C# can be used to develop a wide range of: Windows client applications Windows libraries and components Windows services Web applications Native iOS and Android mobile apps Azure cloud applications and services Gaming consoles and gaming systems Video and virtual reality games Interoperability software like SharePoint Enterprise software Backend services and database programs AI and ML applications Distributed applications Hardware-level programming Virus and malware software GUI-based applications IoT devices Blockchain and distributed ledger technology Who Should Learn the C# Programming Language and Why? C# is one of the most popular programming languages as it can be used for a variety of applications: mobile apps, game development, and enterprise software. What’s more, the C# 8.0 version is packed with several new features and enhancements to the C# language that can change the way developers write their C# code. The most important new features available are ‘null reference types,’ enhanced ‘pattern matching,’ and ‘async streams’ that help you to write more reliable and readable code. As you’re exposed to the fundamental programming concepts of C# in this course, you can work on projects that open the doors for you as a Full Stack Java Developer. So, upskill and master the C# language for a faster career trajectory and salary scope.
68/100 healthsanusanth /
What is JavaScript and what does it do? Before you start learning something new, it’s important to understand exactly what it is and what it does. This is especially useful when it comes to mastering a new programming language. In simple terms, JavaScript is a programming language used to make websites interactive. If you think about the basic makeup of a website, you have HTML, which describes and defines the basic content and structure of the website, then you have CSS, which tells the browser how this HTML content should be displayed—determining things like color and font. With just HTML and CSS, you have a website that looks good but doesn’t actually do much. JavaScript brings the website to life by adding functionality. JavaScript is responsible for elements that the user can interact with, such as drop-down menus, modal windows, and contact forms. It is also used to create things like animations, video players, and interactive maps. Nowadays, JavaScript is an all-purpose programming language—meaning it runs across the entire software stack. The most popular application of JavaScript is on the client side (aka frontend), but since Node.js came on the scene, many people run JavaScript on the server side (aka backend) as well. When used on the client side, JavaScript code is read, interpreted, and executed in the user’s web browser. When used on the server side, it is run on a remote computer. You can learn more about the difference between frontend and backend programming here. JavaScript isn’t only used to create websites. It can also be used to build browser-based games and, with the help of certain frameworks, mobile apps for different operating systems. The creation of new libraries and frameworks is also making it possible to build backend programs with JavaScript, such as web apps and server apps. Is it still worth learning JavaScript in 2021? The world of web development is constantly moving. With so many new tools popping up all the time, it can be extremely difficult to know where you should focus your efforts. As an aspiring developer, you’ll want to make sure that what you’re learning is still relevant in today’s industry. If you’re having doubts about JavaScript, it’s important to know that, since its creation in 1995, JavaScript is pretty much everywhere on the web—and that’s not likely to change any time soon. According to the 2020 StackOverflow developer survey, JavaScript is the most commonly used programming language for the eighth year in a row. It is currently used by 94.5% of all websites and, despite originally being designed as a client-side language, JavaScript has now made its way to the server-side of websites (thanks to Node.js), mobile devices (thanks to React Native and Ionic) and desktop (courtesy of Electron). As long as people are interacting with the web, you can assume that JavaScript is highly relevant—there’s no doubt that this is a language worth knowing! With that in mind, let’s look at some of the key benefits of becoming a JavaScript expert. Why learn JavaScript? The most obvious reason for learning JavaScript is if you have hopes of becoming a web developer. Even if you haven’t got your heart set on a tech career, being proficient in JavaScript will enable you to build websites from scratch—a pretty useful skill to have in today’s job market! If you do want to become a web developer, here are some of the main reasons why you should learn JavaScript: JavaScript experts are versatile JavaScript is an extremely versatile language. Once you’ve mastered it, the possibilities are endless: you can code on the client-side (frontend) using Angular and on the server-side (backend) using Node.js. You can also develop web, mobile, and desktop apps using React, React Native, and Electron, and you can even get involved in machine learning. If you want to become a frontend developer, JavaScript is a prerequisite. However, that’s not the only career path open to you as a JavaScript expert. Mastering this key programming language could see you go on to work in full-stack development, games development, information security software engineering, machine learning, and artificial intelligence—to name just a few! Ultimately, if you want any kind of development or engineering career, proficiency in JavaScript is a must. JavaScript experts are in-demand (and well-paid) JavaScript is the most popular programming language in the world, so it’s no wonder that JavaScript is one of the most sought-after skills in the web development industry today. According to the Devskiller IT Skills and Hiring Report 2020, 72% of companies are looking to hire JavaScript experts. Enter the search term “JavaScript” on job site Indeed and you’ll find over 40,000 jobs requiring this skill (in the US). Run the same search on LinkedIn and the results are in excess of 125,000. At the same time, the global demand for JavaScript seems to outweigh the expertise available on the market. According to this 2018 HackerRank report, 48% of employers worldwide need developers with JavaScript skills, while only 42% of student developers claim to be proficient in JavaScript. And, in their most recent report for 2020, HackerRank once again reports that JavaScript is the most popular language that hiring mangers look for in a web developer candidate. Not only are JavaScript experts in demand—they are also well-paid. In the United States, JavaScript developers earn an average yearly salary of $111,953 per year. We’ve covered this topic in more detail in our JavaScript salary guide, but as you can see, learning JavaScript can really boost your earning potential as a developer. JavaScript is beginner-friendly Compared to many other programming languages, JavaScript offers one of the more beginner-friendly entry points into the world of coding. The great thing about JavaScript is that it comes installed on every modern web browser—there’s no need to set up any kind of development environment, which means you can start coding with JavaScript right away! Another advantage of learning JavaScript as your first programming language is that you get instant feedback; with a minimal amount of JavaScript code, you’ll immediately see visible results. There’s also a huge JavaScript community on sites like Stack Overflow, so you’ll find plenty of support as you learn. Not only is JavaScript beginner-friendly; it will also set you up with some extremely valuable transferable skills. JavaScript supports object-oriented, functional, and imperative styles of programming—skills which can be transferred to any new language you might learn later on, such as Python, Java, or C++. JavaScript provides a crucial introduction to key principles and practices that you’ll take with you throughout your career as a developer. Should you learn plain JavaScript first or can you skip to frameworks and libraries? When deciding whether or not to learn JavaScript, what you’re really asking is whether or not you should learn “vanilla” JavaScript. Vanilla JavaScript just means plain JavaScript without any libraries or frameworks. Let’s explore what this means in more detail now. What is meant by vanilla JavaScript, libraries, and frameworks? If you research the term “vanilla JavaScript”, you might run into some confusion; however, all you need to know is that vanilla JavaScript is used to refer to native, standards-based, non-extended JavaScript. There is no difference between vanilla JavaScript and JavaScript—it’s just there to emphasize the usage of plain JavaScript without the use of libraries and frameworks. So what are libraries and frameworks? JavaScript libraries and frameworks both contain sets of prewritten, ready-to-use JavaScript code—but they’re not the same thing. You can think of a framework as your blueprint for building a website: it gives you a structure to work from, and contains ready-made components and tools that help you to build certain elements much quicker than if you were to code them from scratch. Some popular JavaScript frameworks include Angular, React, Vue, and Node.js. Frameworks also contain libraries. Libraries are smaller than frameworks, and tend to be used for more specific cases. A JavaScript library contains sets of JavaScript code which can be called upon to implement certain functions and features. Let’s imagine you want to code a particular element into your website. You could write, say, ten lines of JavaScript from scratch—or you could take the condensed, ready-made version from your chosen JavaScript library. Some examples of JavaScript libraries include jQuery, Lodash, and Underscore. The easiest way to understand how frameworks and libraries work together is to imagine you are building a house. The framework provides the foundation and the structure, while the library enables you to add in ready-made components (like furniture) rather than building your own from scratch. You can learn more about the relationship between languages and libraries in this post explaining the main differences between JavaScript and jQuery. For now, let’s go back to our original question: How important is it to learn vanilla JavaScript? Should you learn vanilla JavaScript first? When it comes to learning JavaScript, it can be tempting to skip ahead to those time-saving frameworks and libraries we just talked about—and many developers do. However, there are many compelling arguments for learning plain JavaScript first. While JavaScript frameworks may help you get the job done quicker, there’s only so far you can go if you don’t understand the core concepts behind these frameworks. Frontend developer Abhishek Nagekar describes how not learning vanilla JavaScript came back to bite him when he started learning the JavaScript frameworks Node and Express: “As I went to write more and more code in Node and Express, I began to get stuck at even the tiniest problems. Suddenly, I was surrounded with words like callbacks, closures, event loop and prototype. It felt like I got a reintroduction to JavaScript, but this time, it was not a toddler playing in its cradle, it was something of a mysterious monster, challenging me on every other step for not having taken it seriously.” The above Tweet references a long-running joke within the developer community, and although it dates way back to 2015, it’s still highly relevant today. If you want to become a developer who can innovate, not just execute, you need to understand the underlying principles of the web—not just the shortcuts. This means learning vanilla JavaScript before you move on to frameworks. In fact, understanding plain JavaScript will help you later on when it comes to deciding whether to use a framework for a certain project, and if so, which framework to use. Why Study JavaScript? JavaScript is one of the 3 languages all web developers must learn: 1. HTML to define the content of web pages 2. CSS to specify the layout of web pages 3. JavaScript to program the behavior of web pages Learning Speed In this tutorial, the learning speed is your choice. Everything is up to you. If you are struggling, take a break, or re-read the material. Always make sure you understand all the "Try-it-Yourself" examples. The only way to become a clever programmer is to: Practice. Practice. Practice. Code. Code. Code ! Commonly Asked Questions How do I get JavaScript? Where can I download JavaScript? Is JavaScript Free? You don't have to get or download JavaScript. JavaScript is already running in your browser on your computer, on your tablet, and on your smart-phone. JavaScript is free to use for everyone.
55/100 healthsaurabhanimesh /
This is a dynamic website for business purposes. The users can check out the services while interacting with very blissful and beautiful interface. The users can click on the call button from anywhere on the website and directly they would be transferred to the call app where the number is already entered which makes it very much easier for the users to call the company. Then there’s the concept of Time square New York used in this website because Time square correctly signifies the loads and beauty of sign boards at the same time simultaneously. The first page of the website contains a video of Time square and on the other pages the High quality pictures of Time square has been used. The users can read the details of the previous projects of the company and can also read about the services and products that the company is offering to their customers. The users can also demand request on this website after which the company will call them and hence will proceed the deal. This website contains a slide bar in the services and projects menu by which users can smoothly check the services and projects. The website’s been designed fully for every platforms available currently. It is responsive in very possible way and manner which makes this website robust. For the front end part of this websites – HTML, CSS and JAVA SCRIPT has been used and for the backend part NODE.JS has been used. In backend of my website the modules of Express (for serving purpose) has been used. The backend server and data base of Google’s Firebase has been used and all the server part of the work and data base works has been done through there. Firebase Cloud function has been used to serve the website dynamically and this hosting can been done only if we are willing to be a paid user for Firebase. In this website creation no template, bootstrap or any other already coded mechanism has been used. This website has been coded from the scratch and everything in this website is completely manually coded from the scratch .This website is all created with HTML for structuring, CSS for Designing and for additional dynamic functions Java Script has been used. The data base used in it is of Google’s Firebase. Firebase is the best platform for forming a Backend for mobile applications and web application currently across the world. So, every retrieval and fetching of data has been done through Firebase data base and all dynamic data insertion has also been done through that. The hosting of the website has been done also by the firebase server. Media query has been used for making the website responsive for every platform available and every minute details has been taken care off in it. For the background a professional high quality picture has been taken from pexels.com. For the Review Looping part of the website, looping, Time interval function and data retrieval from the Firebase database. For the animation part on scrolling, AOS (Animation on Scroll) has been used. Images and every photos are used in these website with the help of Firebase Storage Functionality, From there only we are fetching the images (of books and blogs) and showing it in here. A pre loader has been used before the starting of website to let the images get loaded properly so that the users do not faces any difficulties For social handling visit purposes, href has been used and for sharing purpose of blog this website has been used - https://sharingbuttons.io/ . The shop section of the website has been coded in a way where the users has to put their information and then that data will be stored in the data base , and from there the company can get connected with that person. For the side bar slider glider package has been used. The clicking appearance of a details box where the information of the products or projects has been created by create Element method of Java script and in that element creation and data fetching is happening at the same time. When we click on the product or project back then we used remove child method of java script to make it normal.
49/100 health