AWS 2 Tier Architecture setup with AWS CLI - Wordpress application on AWS RDS running MySQL
There are two parts to the setup,
- Part 1 - Setting up the network infrastructure (VPC, Subnets, Security Groups)
- Part 2 - Create & Configure the Database, Web & Load Balancer Instances
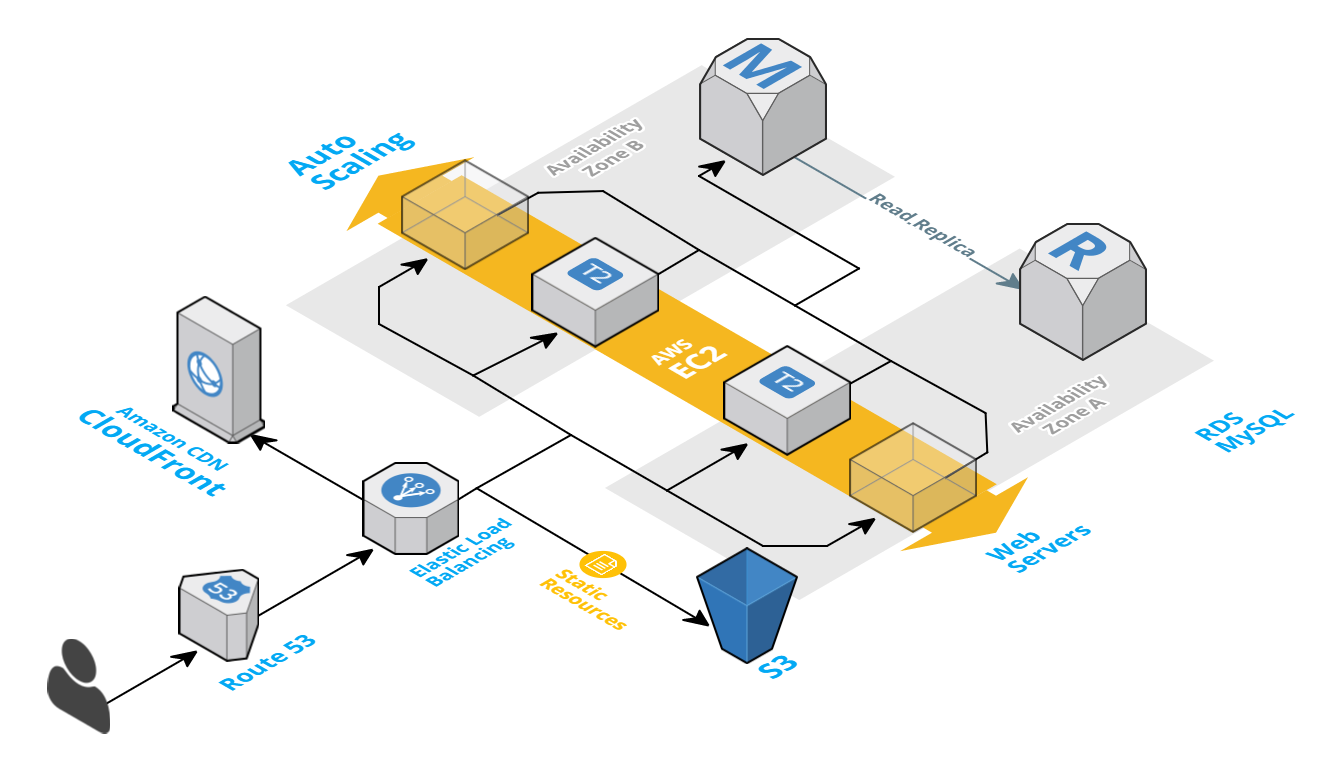 Assuming you have already setup your AWS CLI for Region
 US East (N. Virginia). Lets move forward;
Part 1 - Create VPC, Subnet, Security Group
Setting the AWS Region
export AWS_DEFAULT_REGION=us-east-1
Creating a VPC
Lets create a Virtual Private Cloud - VPC for our setup with /20 range and get our VPC ID using the query parameter and set the output format to text. Its is a good practice to give meaningful name to the AWS resources, Lets call our VPC tmpVPC
vpcID=$(aws ec2 create-vpc \
      --cidr-block 10.0.0.0/20 \
      --query 'Vpc.VpcId' \
      --output text)
Tag the VPC
aws ec2 create-tags --resources "$vpcID" --tags 'Key=Name,Value=tmpVPC'
Instances launched inside a VPC are invisible to the rest of the internet by default. AWS therefore does not bother assigning them a public DNS name. This can be changed easily by enabling the DNS support as shown below,
aws ec2 modify-vpc-attribute --vpc-id "$vpcID" --enable-dns-support "{\"Value\":true}"

aws ec2 modify-vpc-attribute --vpc-id "$vpcID" --enable-dns-hostnames "{\"Value\":true}"
Check if internet gateway is set. If it wasn't there then do these,
internetGatewayId=$(aws ec2 create-internet-gateway \
                  --query 'InternetGateway.InternetGatewayId' \
                  --output text) && echo "$internetGatewayId"
aws ec2 attach-internet-gateway --internet-gateway-id "$internetGatewayId" --vpc-id "$vpcID"
Tag the Internet Gateway
aws ec2 create-tags --resources $internetGatewayId --tags 'Key=Name,Value=tmpVPC-Internet-Gateway'
I have chosen /20 CIDR deliberately to allow us to create different subnets for our db, web instances and reserve some for the future. You might want to choose something else that works better for you. Important: AWS reserves both the first four and the last IP address in each subnet's CIDR block. They're not available for use. The smallest subnet (and VPC) you can create uses a /28 netmask (16 IP addresses), and the largest uses a /16 netmask (65,536 IP addresses). Excellent resources to understand CIDR blocks here & here & my quick help gist
Subnet Reservation for the Database, Web Servers & future
Lets reserve the IP Range to spread across multiple availability zones.
| VPC Range | Availability Zone | Reservation Purpose | IP Ranges | IP Ranges | IP Ranges |
|---|
| 10.0.0.0/20 | | | | | |
| AZ1 | US-East-1b | 10.0.0.0/21 | | |
| AZ1 | Private - DB Subnet | | 10.0.0.0/22 | |
| AZ1 | | | 10.0.4.0/22 | |
| AZ1 | Web Subnet | | | 10.0.4.0/23 |
| AZ1 | Spare Subnet | | | 10.0.6.0/23 |
| | | | | |
| AZ2 | US-East-1c | 10.0.8.0/21 | | |
| AZ2 | Private - DB Subnet | | 10.0.8.0/22 | |
| AZ2 | | | 10.0.12.0/22 | |
| AZ2 | Web Subnet | | | 10.0.12.0/23 |
| AZ2 | Spare Subnet | | | 10.0.14.0/23 |
After creating all the subnets, It should look something like this,

Creating subnets for the DB & Web Servers in AZ1
USEast1b_DbSubnetID=$(aws ec2 create-subnet --vpc-id "$vpcID" --cidr-block 10.0.0.0/22 --availability-zone us-east-1b --query 'Subnet.SubnetId' --output text)

USEast1b_WebSubnetID=$(aws ec2 create-subnet --vpc-id "$vpcID" --cidr-block 10.0.4.0/23 --availability-zone us-east-1b --query 'Subnet.SubnetId' --output text)

USEast1b_SpareSubnetID=$(aws ec2 create-subnet --vpc-id "$vpcID" --cidr-block 10.0.6.0/23 --availability-zone us-east-1b --query 'Subnet.SubnetId' --output text)
Tag the subnet ID's for AZ1
aws ec2 create-tags --resources "$USEast1b_DbSubnetID" --tags 'Key=Name,Value=az1-us-east-1b-DB-Subnet'

aws ec2 create-tags --resources "$USEast1b_WebSubnetID" --tags 'Key=Name,Value=az1-us-east-1b-Web-Subnet'

aws ec2 create-tags --resources "$USEast1b_SpareSubnetID" --tags 'Key=Name,Value=az1-us-east-1b-Spare-Subnet'
Creating subnets for the DB & Web Servers in AZ2
USEast1c_DbSubnetID=$(aws ec2 create-subnet --vpc-id "$vpcID" --cidr-block 10.0.8.0/22 --availability-zone us-east-1c --query 'Subnet.SubnetId' --output text)

USEast1c_WebSubnetID=$(aws ec2 create-subnet --vpc-id "$vpcID" --cidr-block 10.0.12.0/23 --availability-zone us-east-1c --query 'Subnet.SubnetId' --output text)

USEast1c_SpareSubnetID=$(aws ec2 create-subnet --vpc-id "$vpcID" --cidr-block 10.0.14.0/23 --availability-zone us-east-1c --query 'Subnet.SubnetId' --output text)
Tag the subnet ID's for AZ2
aws ec2 create-tags --resources "$USEast1c_DbSubnetID" --tags 'Key=Name,Value=az1-us-east-1c-DB-Subnet'

aws ec2 create-tags --resources "$USEast1c_WebSubnetID" --tags 'Key=Name,Value=az1-us-east-1c-Web-Subnet'

aws ec2 create-tags --resources "$USEast1c_SpareSubnetID" --tags 'Key=Name,Value=az1-us-east-1c-Spare-Subnet'
Configuring the Route Table
Each subnet needs to have a route table associated with it to specify the routing of its outbound traffic. By default every subnet inherits the default VPC route table which allows for intra-VPC communication only.
The following adds a route table to our subnet that allows traffic not meant for an instance inside the VPC to be routed to the internet through our earlier created internet gateway.
routeTableID=$(aws ec2 create-route-table --vpc-id "$vpcID" --query 'RouteTable.RouteTableId' --output text)

aws ec2 create-route --route-table-id "$routeTableID" --destination-cidr-block 0.0.0.0/0 --gateway-id "$internetGatewayId"

aws ec2 associate-route-table --route-table-id "$routeTableID" --subnet-id "$USEast1b_WebSubnetID"

aws ec2 associate-route-table --route-table-id "$routeTableID" --subnet-id "$USEast1c_WebSubnetID"
Creating a security group for the Web Servers
- Group Name -
webSecGrp
- Description -
My Web Security Group
webSecGrpID=$(aws ec2 create-security-group --group-name webSecGrp \
            --description "Security Group for Web servers" \
            --vpc-id "$vpcID" \
            --output text)
Add a rule that allows inbound SSH, HTTP, HTTP traffic ( from any source )
aws ec2 authorize-security-group-ingress --group-id "$webSecGrpID" --protocol tcp --port 22 --cidr 0.0.0.0/0
aws ec2 authorize-security-group-ingress --group-id "$webSecGrpID" --protocol tcp --port 80 --cidr 0.0.0.0/0
aws ec2 authorize-security-group-ingress --group-id "$webSecGrpID" --protocol tcp --port 443 --cidr 0.0.0.0/0
Interesting reading here about why we need to use security group ID instead of name; AWS Documentation & Github Bug Report
When you specify a security group for a nondefault VPC to the CLI or the API actions, you must use the security group ID and not the security group name to identify the security group.
Part 2 - Create & Configure the Database, Web & Load Balancer Instances
Creating the RDS Instance
Pre-Requisites
Create the DB Subnet
Creates a new DB subnet group. DB subnet groups must contain at least one subnet in at least two AZs in the region.
aws rds create-db-subnet-group \
        --db-subnet-group-name "mysqlDBSubnet" \
        --db-subnet-group-description "Subnet group for my databases instances" \
        --subnet-ids "$USEast1b_DbSubnetID" "$USEast1c_DbSubnetID"
Creating a Security Group for RDS Database (running MySQL)
- Group Name -
dbSecGrp
- Description -
My Database Security Group
dbSecGrpID=$(aws ec2 create-security-group \
           --group-name dbSecGrp \
           --description "Security Group for database servers" \
           --vpc-id "$vpcID" \
           --output text)
Add a rule that allows inbound MySQL from Webservers (in our Web Security Group)
aws ec2 authorize-security-group-ingress \
        --group-id "$dbSecGrpID" \
        --protocol tcp \
        --port 3306 \
        --source-group \
        "$webSecGrpID"
Create a DB parameter group to monitor CRUD
aws rds create-db-parameter-group \
    --db-parameter-group-name myParamGrp \
    --db-parameter-group-family MySQL5.6 \
    --description "My new parameter group"

aws rds modify-db-parameter-group --db-parameter-group-name myParamGrp --parameters "ParameterName=general_log, ParameterValue=ON, Description=logParameter,ApplyMethod=immediate"
Start the RDS - MySQL Instance
rdsInstID=rds-mysql-inst01
aws rds create-db-instance \
        --db-instance-identifier "$rdsInstID" \
        --allocated-storage 5 \
        --db-instance-class db.t2.micro \
        --no-multi-az \
        --no-auto-minor-version-upgrade \
        --availability-zone us-east-1b \
        --vpc-security-group-ids "$dbSecGrpID" \
        --db-subnet-group-name "mysqldbsubnet" \
        --engine mysql \
        --port 3306 \
        --master-username dbuser \
        --master-user-password dbuserpass \
        --db-parameter-group-name myParamGrp \
        --db-name wpdb \
        --backup-retention-period 3

aws rds modify-db-instance --db-instance-identifier "$rdsInstID" --db-parameter-group-name myParamGrp
Refer:
Create the Web Servers
Create the SSH Keys & boot-strap the binaries
aws ec2 create-key-pair --key-name webKey --query 'KeyMaterial' --output text > webKey.pem
chmod 400 webKey.pem

cat >> userDataScript <<EOF
#!/bin/bash
set -e -x

# Setting up the HTTP server
yum update -y
yum install -y httpd php php-mysql mysql
service httpd start
chkconfig httpd on
groupadd www
usermod -a -G www ec2-user


# Download wordpress site & move t