Loading repository data…
jessevdp / repository
nodejs-api-starter
🏗 Boilerplate for a NodeJS REST API using Express, Mongoose, Typescript
#dotenv#eslint#express#jest#mongo-seeding#mongoose
Live repository statistics
★ 1Stars
⑂ 0Forks
◯ 13Open issues
◉ 1Watchers
29/100
OPENREPOHUB HEALTH SIGNAL
Limited signals
A transparent discovery signal based on current public GitHub metadata.
Recent activity35% weight
10
Community adoption25% weight
0
Maintenance state20% weight
40
License clarity10% weight
100
Project information10% weight
75
This score does not audit code, security, maintainers, documentation quality, or suitability. Verify the repository and its current documentation before adoption.
README preview
NodeJS API starter
Contents
Running the project
- Make sure you have the required software installed. (See required software.)
- Clone the repository.
- Install dependencies (run
yarn). - Configure the project through environment variables (also possible through an
.envfile). (See configuration.) - Build the project (run
yarn run build). - Start the server (run
yarn run start).
Required software
Configuration
| Variable | Type | Default | Explanation |
|---|---|---|---|
PORT | number | 8000 | Determines the port on which the application will listen. |
DB_HOST | string | "localhost" | Hostname of the MongoDB instance. |
DB_PORT | string | "27017" | Port of the MongoDB instance. |
DB_NAME | string? | — | Optional. Name of the database that this app can use. Will use the default database of the MongoDB instance if omitted. |
DB_USERNAME | string? | — | Optional. The username of your MongoDB user. May not be required during development if your local MongoDB instance does not have access control enabled. |
DB_PASSWORD | string? | — | Optional. The password for your MongoDB user. May not be required during development if your local MongoDB instance does not have access control enabled. |
Development Manual
Development setup
- Make sure you have the required software installed. (See required software.)
- Clone the repository.
- Install dependencies (run
yarn). - Configure the project.
- Create a
.envfile by copying theexample.envfile. (Runcp example.env .env.) - Configure your settings. (See configuration.)
- Create a
- Seed your data base (run
yarn run seed).
Useful commands for development
yarn run devruns the project using nodemon so it is restarted when the code changes.yarn run test:watchruns the test suite in interactive mode, rerunning the tests when the code changes.yarn run lint:fixlints the code, automatically fixing issues where possible.yarn run buildbuilds the project.yarn run seedfills the database with seed data. (Note, this drops the database first.)
Project structure
The general structure and architecture of this project are based on the article titled "Bulletproof node.js project architecture". In short, the architecture consists of 3 main layers: routing, services, and data access. Additionally, the publisher/subscriber pattern is used to decouple side effects from service layer. The following diagram summarizes these components:
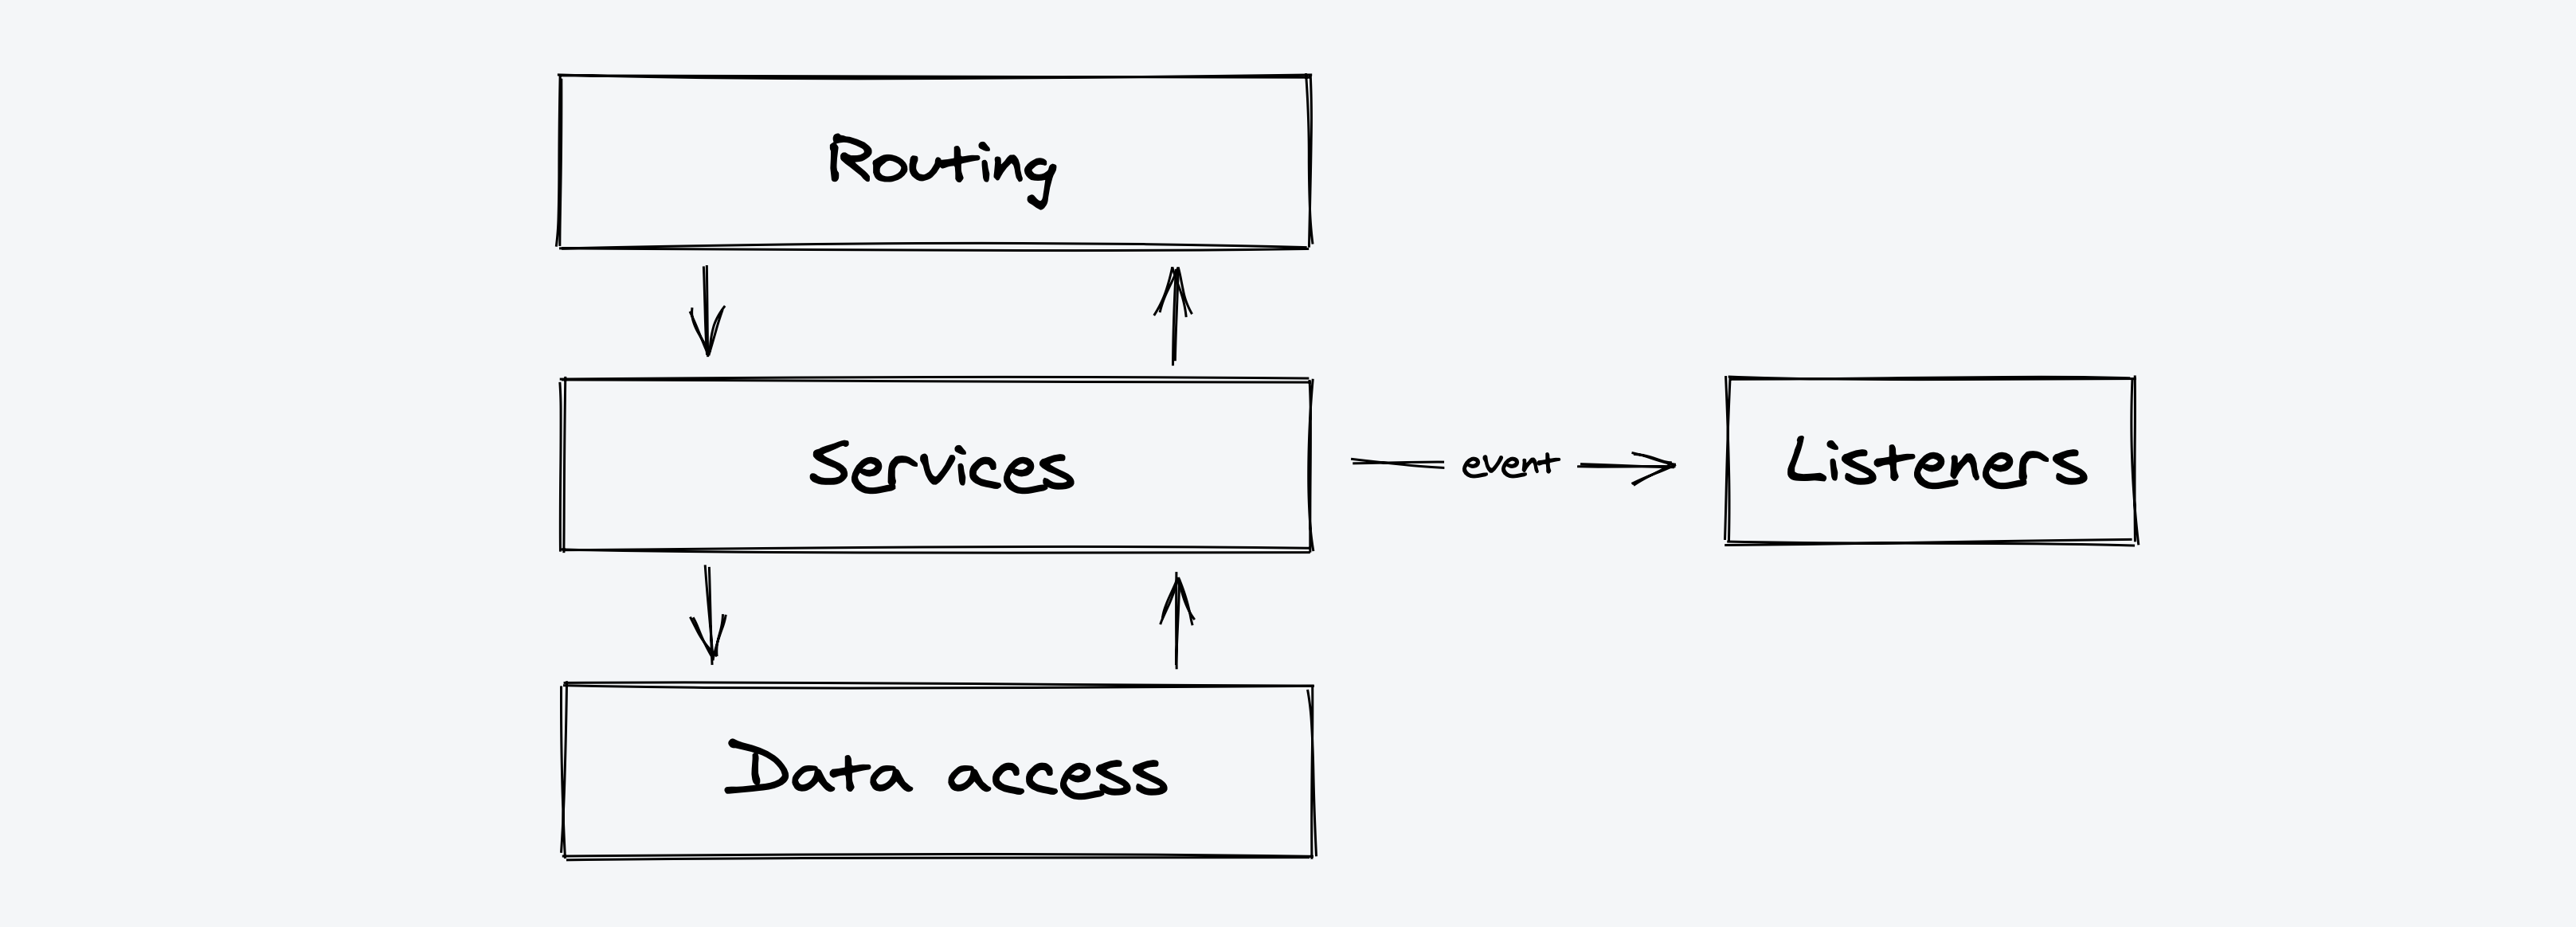
In the case of this project:
- The routing layer refers to the express routing logic. See routing.
- The service layer consists of service classes. See services.
- The data access layer refers to Mongoose models.
- The event publisher/subscriber layer refers to the events and listeners. See events and listeners.
Aside from these major architectural components the project contains several other types of components.
- Config. Configuration of the application is done through several typescript files. See configuration.
- Loaders. The startup sequence of the application is split into several smaller modules.
- Tests. See testing.
- Seeders. See seeding.
Consider the folder structure of the project, it separates all of these components.
.
├── src/
│   ├── index.ts
│   ├── app.ts
│   ├── api/ (routing)
│   │   ├── middleware/
│   │   └── routes/
│   ├── config/
│   ├── events/
│   ├── listeners/
│   ├── loaders/
│   ├── models/
│   └── services/
├── seeds/
│   ├── index.ts
│   └── data/
└── tests/
    ├── *.test.ts
    └── util/
Routing
The first layer, the routing layer, is responsible for everything related to HTTP requests and responses. A route controller knows about the request and response object, request parameters, the request body, HTTP status codes, etc. Important to note is that route controllers do NOT contain business logic, nor do they have any notion of a database etc. This is to ensure a good separation of concerns. Instead, route controllers call to a service class to handle business logic.
In express it is possible to separate routing logic into multiple modular routers. This concept is used to split the applications routing logic up into smaller modules. Consider the following code snippet, which contains a sample route controller using express.Router. This router can be imported and attached to the main express app.
import { Router } from "express";
const router = Router();

// Attach route handlers and other middleware
router.get("/subroute", async (req, res) => {});

export default router;
This router should be imported in app.ts and attached to the main express app. Consider the following example, in which the exampleRouter is attached to the main app at the /examples route.
import exampleRouter from "./api/routes/example";
app.use("/examples", exampleRouter);
Services
The second layer, the service layer, is responsible for handling business logic and interacting with the data access layer. A service class knows about Mongoose models. Additionally, it may fire/emit events that can be handled by event listeners. Important to note is that a service class should not know anything about HTTP, as this is the job of the routing layer.
The service layer consists of service classes, each responsible for an isolated piece of business logic. The following code snippet contains a very basic service class for managing Example models.
import ExampleModel, { Example } from "../models/example";

class ExampleService {
  async findAll(): Promise<Example[]> {
    return ExampleModel.find();
  }
}

export default new ExampleService();
Events and listeners
The publisher/subscriber pattern is used to decouple the business logic contained in a service from any side effects it causes. A great example use case is starting an email sequence after a user signs up. The service layer should take care of actually creating the new user record. If this service also calls some 3rd party email service the code can become quite messy. Instead, we emit an event (call it UserSignup). A corresponding listener can subscribe to this event and act accordingly.
Events
- Events are classes that extend the abstract
Eventclass. - An event class can take parameters, which is useful for passing data to the listeners.
- Events should be placed in a file in
src/events/. Because event classes are usually quite small we can place related events in the same file.
import Event from "./base-event";

export class ExampleEvent extends Event {
  public someParam: string;

  constructor(param: string) {
    super();
    this.someParam = param;
  }
}
Listeners
- Call to the
subscribefunction ofsrc/eventsto register themselves. - The callback receives an instance of the event when it occurs.
- Listener files are placed in the
src/listeners/directory. They are automatically imported from there.
import { subscribe } from "../events";
import { ExampleEvent } from "../events/example";

subscribe(ExampleEvent.eventName, event => {
  // access event.someParam etc.
})
Emitting an event
To emit an event, import the emit function from src/events/ and call it by passing an instance of an event to it. Consider the following example.
import { emit } from "../events";
import { ExampleEvent } from "../events/example";

emit(new ExampleEvent("parameter"));
Configuration
Configuration for this project is done through typescript files stored under src/config. This ensures all code referencing configuration items is still type safe. Configuration is broken up into multiple smaller config files each containing only related configuration items. For example the config/database.ts file contains all configuration for the MongoDB connection.
While some configuration items can be hard coded into these typescript files, most config items depend on the environment in which the app is running. Therefore, these config items should be read from environment variables. Note that some env related config items can have sensible defaults. Consider the following example:
const databaseConfig {
  hostname: process.env.DB_HOST || "localhost",
}
To make declaring environment variables a little bit easier during development, this project supports declaring environment variables through an .env file. The .env file should be located in the root of the repository.
Adding a new config file
While the configuration is split up into multiple files, we want the config to appear as a single object in the rest of the code. For this reason the individual config files are re-exported from the config/index.ts file. When adding a new config file, remember to re-export it as well.
import databaseConfig from "./database";

// re-export
export default {
  database: databaseConfig
}
Seeding
This project uses mongo-seeding to facilitate the database seeding process. seeds/index.ts contains a script that will seed the database with example data. This script is called by running yarn run seed.
The actual data that will be imported into the database is defined in seeds/data/, read the import data definition guide of mongo-seeding for more info on how the files within seeds/data/ should be organized. Note that this project uses Typescript files for the seeder files, because it allows us to generate fake data.
Faker is used to generate random data within the seeders.
Consider the following example seeder. It creates 10 data objects for Example models, each with a random word for the name property. Additionally, it adds the createdAt and updatedAt timestamps to the created objects.
import faker from "faker";
import { ItemData } from "../../../src/models/example";

function createExample(): ExampleData {
  return {
    name: faker.random.word()
  };
}

const data = [];
const amount = 10;

for (let i = 0; i < amount; i++) {
  const item = {
    ...createExample(),
    createdAt: new Date(),
    updatedAt: new Date()
  };
  data.push(item);
}

export = data;
Testing
This project uses two different types of tests: unit tests that test a specific component in isolation, and feature tests that test a complete feature from the API call to the d