NumPyCNN: Implementing Convolutional Neural Networks From Scratch
NumPyCNN is a Python implementation for convolutional neural networks (CNNs) from scratch using NumPy.
IMPORTANT If you are coming for the code of the tutorial titled Building Convolutional Neural Network using NumPy from Scratch, then it has been moved to the TutorialProject directory on 20 May 2020.
The project has a single module named cnn.py which implements all classes and functions needed to build the CNN.
It is very important to note that the project only implements the forward pass of training CNNs and there is no learning algorithm used. Just the learning rate is used to make some changes to the weights after each epoch which is better than leaving the weights unchanged.
The project can be used for classification problems where only 1 class per sample is allowed.
The project will be extended to train CNN using the genetic algorithm with the help of a library named PyGAD. Check the library's documentation at Read The Docs: https://pygad.readthedocs.io
Donation
Installation
To install PyGAD, simply use pip to download and install the library from PyPI (Python Package Index). The library is at PyPI at this page https://pypi.org/project/pygad.
Install PyGAD with the following command:
pip install pygad
To get started with PyGAD, please read the documentation at Read The Docs https://pygad.readthedocs.io.
PyGAD Source Code
The source code of the PyGAD' modules is found in the following GitHub projects:
The documentation of PyGAD is available at Read The Docs https://pygad.readthedocs.io.
PyGAD Documentation
The documentation of the PyGAD library is available at Read The Docs at this link: https://pygad.readthedocs.io. It discusses the modules supported by PyGAD, all its classes, methods, attribute, and functions. For each module, a number of examples are given.
If there is an issue using PyGAD, feel free to post at issue in this GitHub repository https://github.com/ahmedfgad/GeneticAlgorithmPython or by sending an e-mail to ahmed.f.gad@gmail.com.
If you built a project that uses PyGAD, then please drop an e-mail to ahmed.f.gad@gmail.com with the following information so that your project is included in the documentation.
- Project title
- Brief description
- Preferably, a link that directs the readers to your project
Please check the Contact Us section for more contact details.
Life Cycle of PyGAD
The next figure lists the different stages in the lifecycle of an instance of the pygad.GA class. Note that PyGAD stops when either all generations are completed or when the function passed to the on_generation parameter returns the string stop.
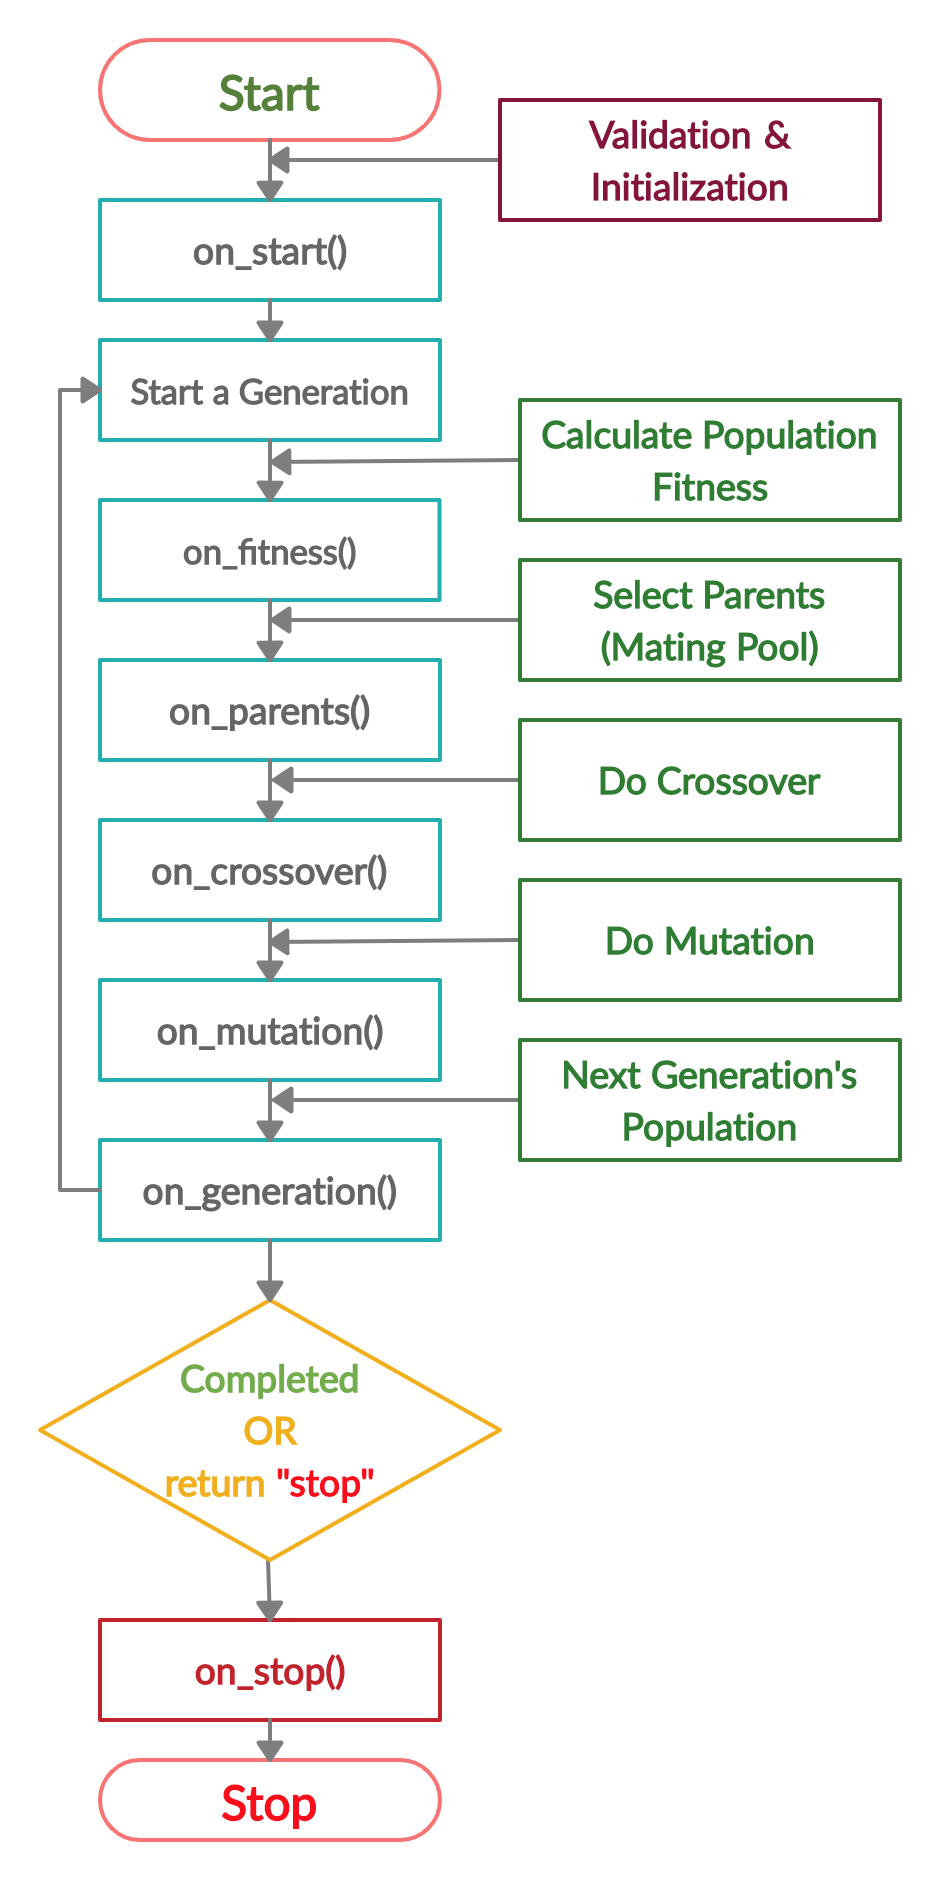
The next code implements all the callback functions to trace the execution of the genetic algorithm. Each callback function prints its name.
import pygad
import numpy

function_inputs = [4,-2,3.5,5,-11,-4.7]
desired_output = 44

def fitness_func(ga_instance, solution, solution_idx):
    output = numpy.sum(solution*function_inputs)
    fitness = 1.0 / (numpy.abs(output - desired_output) + 0.000001)
    return fitness

fitness_function = fitness_func

def on_start(ga_instance):
    print("on_start()")

def on_fitness(ga_instance, population_fitness):
    print("on_fitness()")

def on_parents(ga_instance, selected_parents):
    print("on_parents()")

def on_crossover(ga_instance, offspring_crossover):
    print("on_crossover()")

def on_mutation(ga_instance, offspring_mutation):
    print("on_mutation()")

def on_generation(ga_instance):
    print("on_generation()")

def on_stop(ga_instance, last_population_fitness):
    print("on_stop()")

ga_instance = pygad.GA(num_generations=3,
                       num_parents_mating=5,
                       fitness_func=fitness_function,
                       sol_per_pop=10,
                       num_genes=len(function_inputs),
                       on_start=on_start,
                       on_fitness=on_fitness,
                       on_parents=on_parents,
                       on_crossover=on_crossover,
                       on_mutation=on_mutation,
                       on_generation=on_generation,
                       on_stop=on_stop)

ga_instance.run()
Based on the used 3 generations as assigned to the num_generations argument, here is the output.
on_start()

on_fitness()
on_parents()
on_crossover()
on_mutation()
on_generation()

on_fitness()
on_parents()
on_crossover()
on_mutation()
on_generation()

on_fitness()
on_parents()
on_crossover()
on_mutation()
on_generation()

on_stop()
Example
Check the PyGAD's documentation for information about the implementation of this example.
import numpy
import pygad.cnn

train_inputs = numpy.load("dataset_inputs.npy")
train_outputs = numpy.load("dataset_outputs.npy")

sample_shape = train_inputs.shape[1:]
num_classes = 4

input_layer = pygad.cnn.Input2D(input_shape=sample_shape)
conv_layer1 = pygad.cnn.Conv2D(num_filters=2,
                               kernel_size=3,
                               previous_layer=input_layer,
                               activation_function=None)
relu_layer1 = pygad.cnn.Sigmoid(previous_layer=conv_layer1)
average_pooling_layer = pygad.cnn.AveragePooling2D(pool_size=2,
                                                   previous_layer=relu_layer1,
                                                   stride=2)

conv_layer2 = pygad.cnn.Conv2D(num_filters=3,
                               kernel_size=3,
                               previous_layer=average_pooling_layer,
                               activation_function=None)
relu_layer2 = pygad.cnn.ReLU(previous_layer=conv_layer2)
max_pooling_layer = pygad.cnn.MaxPooling2D(pool_size=2,
                                           previous_layer=relu_layer2,
                                           stride=2)

conv_layer3 = pygad.cnn.Conv2D(num_filters=1,
                               kernel_size=3,
                               previous_layer=max_pooling_layer,
                               activation_function=None)
relu_layer3 = pygad.cnn.ReLU(previous_layer=conv_layer3)
pooling_layer = pygad.cnn.AveragePooling2D(pool_size=2,
                                           previous_layer=relu_layer3,
                                           stride=2)

flatten_layer = pygad.cnn.Flatten(previous_layer=pooling_layer)
dense_layer1 = pygad.cnn.Dense(num_neurons=100,
                               previous_layer=flatten_layer,
                               activation_function="relu")
dense_layer2 = pygad.cnn.Dense(num_neurons=num_classes,
                               previous_layer=dense_layer1,
                               activation_function="softmax")

model = pygad.cnn.Model(last_layer=dense_layer2,
                        epochs=1,
                        learning_rate=0.01)

model.summary()

model.train(train_inputs=train_inputs,
            train_outputs=train_outputs)

predictions = model.predict(data_inputs=train_inputs)
print(predictions)

num_wrong = numpy.where(predictions != train_outputs)[0]
num_correct = train_outputs.size - num_wrong.size
accuracy = 100 * (num_correct/train_outputs.size)
print("Number of correct classifications : {num_correct}.".format(num_correct=num_correct))
print("Number of wrong classifications : {num_wrong}.".format(num_wrong=num_wrong.size))
print("Classification accuracy : {accuracy}.".format(accuracy=accuracy))
For More Information
There are different resources that can be used to get started with the building CNN and its Python implementation.
Tutorial: Implementing Genetic Algorithm in Python
To start with coding the genetic algorithm, you can check the tutorial titled Genetic Algorithm Implementation in Python available at these links:
This tutorial is prepared based on a previous version of the project but it still a good resource to start with coding the genetic algorithm.

Tutorial: Introduction to Genetic Algorithm
Get started with the genetic algorithm by reading the tutorial titled Introduction to Optimization with Genetic Algorithm which is available at these links:
Tutorial: Build Neural Networks in Python
Read about building neural networks in Python through the tutorial titled Artificial Neural Network Implementation using NumPy and Classification of the Fruits360 Image Dataset available at these links: