javascriptdata /
dnotebook
Dnotebook is a Jupyter-like library for javaScript environment. It allows you to create and share pages that contain live code, text and visualizations.
Loading repository data…
BIANG-qilie / repository
It is a lightweight Jupyter notebook based on Python with pure code and no GUI ,which is used to output some exist questions and its answers.
By : Biang
基于python开发的一个纯代码没有GUI的究极轻量级刷题notebook(需要自己准备docx文件)
pip install python-docx
当
separator_between_number_and_question_text = '.'
separator_between_option_and_option_text = ','
separator_between_answer_tag_and_answer = ':'
时,格式如下
number1.question_text
option1,option1_text
option2,option2_text
...
optionN,optionN_text
answer_tag: answer
number2.question_text
option1,option1_text
option2,option2_text
...
optionN,optionN_text
answer_tag: answer
...
file_path = "xxx.docx" #文件名
question_type = {
"single":False,
"multiple":True,
"T_or_F":False
} #题型 单选、多选、判断
separator_between_number_and_question_text = '、' #题号和问题之间的分隔符
separator_between_option_and_option_text = '、' #选项和选项内容之间的分隔符
separator_between_answer_tag_and_answer = ':' #答案标签和答案之间的分隔符
answer_tag = '答案' #答案标签
T_or_F_options = ['正确','错误'] #判断题的选项文字
以pycharm为例,将前面配置信息、导入库、准备工作运行完后,
点击 question=Get_question(questions=questions,disposable=True) 左边的绿色箭头出题目
点击 Get_answer(answer_tag=answer_tag,question=question) 左边的绿色箭头出答案
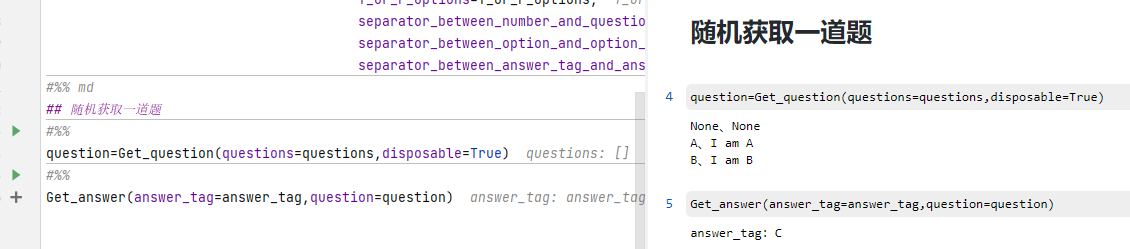
其中 disposable=True时不会做到重复的题目,反之则会
Selected from shared topics, language and repository description—not editorial ratings.
javascriptdata /
Dnotebook is a Jupyter-like library for javaScript environment. It allows you to create and share pages that contain live code, text and visualizations.
dshahid380 /
Welcome to data analysis with pandas tutorial. In this tutorial i have covered all the topic of pandas and tried to explain with lesser number of words.This tutorial is totally written in jupyter notebook so that anyone can clone and run it.
The-Singularity-Research /
This is course material for a course on linear algebra and mathematical prerequisites for quantum computing. It contains Jupyter notebooks and Python scripts that can be downloaded as part of the course.
Komal01 /
Phishing website detection system provides strong security mechanism to detect and prevent phishing domains from reaching user. This project presents a simple and portable approach to detect spoofed webpages and solve security vulnerabilities using Machine Learning. It can be easily operated by anyone since all the major tasks are happening in the backend. The user is required to provide URL as input to the GUI and click on submit button. The output is shown as “YES” for phishing URL and “NO” for not phished URL. PYTHON DEPENDENCIES: • NumPy, Pandas, Scikit-learn: For Data cleaning, Data analysis and Data modelling. • Pickle: For exporting the model to local machine • Tkinter, Pyqt, QtDesigner: For building up the Graphical User Interface (GUI) of the software. To avoid the pain of installing independent packages and libraries of python, install Anaconda from www.anaconda.com. It is a Python data science platform which has all the ML libraries, Data analysis libraries, Jupyter Notebooks, Spyder etc. built in it which makes it easy to use and efficient. Steps to be followed for running the code of the software: • Install anaconda in the system. • gui.py : It contains the code for the GUI and is linked to other modules of the software. • Feature_extractor.py: It contains the code of Data analysis and data modelling. • Rf_model.py: It contains the trained machine learning model. • Only gui.py is to be run to execute the whole software.
mudigosa /
Image Classifier Going forward, AI algorithms will be incorporated into more and more everyday applications. For example, you might want to include an image classifier in a smartphone app. To do this, you'd use a deep learning model trained on hundreds of thousands of images as part of the overall application architecture. A large part of software development in the future will be using these types of models as common parts of applications. In this project, you'll train an image classifier to recognize different species of flowers. You can imagine using something like this in a phone app that tells you the name of the flower your camera is looking at. In practice, you'd train this classifier, then export it for use in your application. We'll be using this dataset of 102 flower categories. When you've completed this project, you'll have an application that can be trained on any set of labelled images. Here your network will be learning about flowers and end up as a command line application. But, what you do with your new skills depends on your imagination and effort in building a dataset. This is the final Project of the Udacity AI with Python Nanodegree Prerequisites The Code is written in Python 3.6.5 . If you don't have Python installed you can find it here. If you are using a lower version of Python you can upgrade using the pip package, ensuring you have the latest version of pip. To install pip run in the command Line python -m ensurepip -- default-pip to upgrade it python -m pip install -- upgrade pip setuptools wheel to upgrade Python pip install python -- upgrade Additional Packages that are required are: Numpy, Pandas, MatplotLib, Pytorch, PIL and json. You can donwload them using pip pip install numpy pandas matplotlib pil or conda conda install numpy pandas matplotlib pil In order to intall Pytorch head over to the Pytorch site select your specs and follow the instructions given. Viewing the Jyputer Notebook In order to better view and work on the jupyter Notebook I encourage you to use nbviewer . You can simply copy and paste the link to this website and you will be able to edit it without any problem. Alternatively you can clone the repository using git clone https://github.com/fotisk07/Image-Classifier/ then in the command Line type, after you have downloaded jupyter notebook type jupyter notebook locate the notebook and run it. Command Line Application Train a new network on a data set with train.py Basic Usage : python train.py data_directory Prints out current epoch, training loss, validation loss, and validation accuracy as the netowrk trains Options: Set direcotry to save checkpoints: python train.py data_dor --save_dir save_directory Choose arcitecture (alexnet, densenet121 or vgg16 available): pytnon train.py data_dir --arch "vgg16" Set hyperparameters: python train.py data_dir --learning_rate 0.001 --hidden_layer1 120 --epochs 20 Use GPU for training: python train.py data_dir --gpu gpu Predict flower name from an image with predict.py along with the probability of that name. That is you'll pass in a single image /path/to/image and return the flower name and class probability Basic usage: python predict.py /path/to/image checkpoint Options: Return top K most likely classes: python predict.py input checkpoint ---top_k 3 Use a mapping of categories to real names: python predict.py input checkpoint --category_names cat_To_name.json Use GPU for inference: python predict.py input checkpoint --gpu Json file In order for the network to print out the name of the flower a .json file is required. If you aren't familiar with json you can find information here. By using a .json file the data can be sorted into folders with numbers and those numbers will correspond to specific names specified in the .json file. Data and the json file The data used specifically for this assignemnt are a flower database are not provided in the repository as it's larger than what github allows. Nevertheless, feel free to create your own databases and train the model on them to use with your own projects. The structure of your data should be the following: The data need to comprised of 3 folders, test, train and validate. Generally the proportions should be 70% training 10% validate and 20% test. Inside the train, test and validate folders there should be folders bearing a specific number which corresponds to a specific category, clarified in the json file. For example if we have the image a.jpj and it is a rose it could be in a path like this /test/5/a.jpg and json file would be like this {...5:"rose",...}. Make sure to include a lot of photos of your catagories (more than 10) with different angles and different lighting conditions in order for the network to generalize better. GPU As the network makes use of a sophisticated deep convolutional neural network the training process is impossible to be done by a common laptop. In order to train your models to your local machine you have three options Cuda -- If you have an NVIDIA GPU then you can install CUDA from here. With Cuda you will be able to train your model however the process will still be time consuming Cloud Services -- There are many paid cloud services that let you train your models like AWS or Google Cloud Coogle Colab -- Google Colab gives you free access to a tesla K80 GPU for 12 hours at a time. Once 12 hours have ellapsed you can just reload and continue! The only limitation is that you have to upload the data to Google Drive and if the dataset is massive you may run out of space. However, once a model is trained then a normal CPU can be used for the predict.py file and you will have an answer within some seconds. Hyperparameters As you can see you have a wide selection of hyperparameters available and you can get even more by making small modifications to the code. Thus it may seem overly complicated to choose the right ones especially if the training needs at least 15 minutes to be completed. So here are some hints: By increasing the number of epochs the accuracy of the network on the training set gets better and better however be careful because if you pick a large number of epochs the network won't generalize well, that is to say it will have high accuracy on the training image and low accuracy on the test images. Eg: training for 12 epochs training accuracy: 85% Test accuracy: 82%. Training for 30 epochs training accuracy 95% test accuracy 50%. A big learning rate guarantees that the network will converge fast to a small error but it will constantly overshot A small learning rate guarantees that the network will reach greater accuracies but the learning process will take longer Densenet121 works best for images but the training process takes significantly longer than alexnet or vgg16 *My settings were lr=0.001, dropoup=0.5, epochs= 15 and my test accuracy was 86% with densenet121 as my feature extraction model. Pre-Trained Network The checkpoint.pth file contains the information of a network trained to recognise 102 different species of flowers. I has been trained with specific hyperparameters thus if you don't set them right the network will fail. In order to have a prediction for an image located in the path /path/to/image using my pretrained model you can simply type python predict.py /path/to/image checkpoint.pth Contributing Please read CONTRIBUTING.md for the process for submitting pull requests. Authors Shanmukha Mudigonda - Initial work Udacity - Final Project of the AI with Python Nanodegree
ataturhan21 /
It is a Jupyter notebook that compares different trading strategies using technical analysis, machine learning, and deep learning methods.